How to Troubleshoot High Disk Usage in Windows 10
Is Your Hard Drive Screaming for Help? Taming High Disk Usage in Windows 10
Hey there, tech enthusiasts and everyday computer users! Let's talk about something we've all probably experienced at some point: that dreaded moment when your Windows 10 PC grinds to a halt, the hard drive light stays stubbornly lit, and everything feels sluggish. It's like trying to run a marathon in quicksand, isn't it? You click on an application, and you wait… and wait… and wait some more. You start wondering if maybe, just maybe, brewing a cup of coffee while you wait is actually a productive use of your time.
High disk usage – it's the bane of many a Windows user's existence. It's that persistent problem that can turn a perfectly capable machine into a digital paperweight. But what exactlyishigh disk usage? Well, simply put, it means your hard drive (or SSD) is working overtime. Windows 10, in particular, seems prone to this issue, with users often reporting 90% to 100% disk usage even when they're not actively doing anything demanding. This can lead to frustratingly slow performance, unresponsive applications, and an overall feeling of digital gridlock.
Imagine this: you're trying to edit a video for your You Tube channel. You've got a deadline looming, and the creative juices are flowing. But every time you try to cut a clip, add an effect, or even just scrub through the timeline, your computer freezes. The disk usage spikes, the beach ball of death (or its Windows equivalent) appears, and your inspiration slowly drains away. Suddenly, that passion project feels more like a punishment. Or perhaps you're trying to get some work done. You have multiple browser tabs open, a Word document, and a spreadsheet all vying for attention. But every time you switch between applications, the same thing happens: the dreaded lag, the spinning cursor, the feeling that your computer is staging a rebellion against your productivity.
Why does this happen? Well, there are a multitude of reasons. It could be a rogue process hogging resources, a malfunctioning driver, a Windows update gone awry, or even malware lurking in the shadows. It could also be something as simple as a poorly optimized system or too many startup programs vying for attention. Think of your hard drive as a busy highway. When traffic is flowing smoothly, everything is fine. But when there's a sudden bottleneck – a slow driver, an accident, or just too many cars trying to use the same lane – everything grinds to a halt. That's essentially what's happening with high disk usage.
The good news is that you don't have to live with this frustration. There are steps you can take to diagnose and fix the problem. We're going to dive deep into the various causes of high disk usage in Windows 10 and, more importantly, provide you with a comprehensive toolkit of solutions to get your system running smoothly again. We'll explore everything from basic troubleshooting steps to more advanced techniques, empowering you to take control of your computer's performance. We'll look at common culprits like faulty drivers, problematic services, and even the sometimes-mysterious world of virtual memory. We'll also delve into the realm of system optimization, showing you how to streamline your Windows 10 installation for maximum efficiency.
So, buckle up, grab your favorite beverage, and prepare to embark on a journey to reclaim your computer's performance. Are you ready to transform your sluggish machine into a lean, mean, processing machine? Let's dive in and uncover the secrets to taming high disk usage in Windows 10!
Let’s explore how to reclaim the smooth, responsive performance you deserve!
Understanding the Culprits Behind High Disk Usage
Okay, friends, let's get down to brass tacks. High disk usage isn't just some random quirk of your computer; it's usually a symptom of something specific going wrong. Understanding the common culprits is the first step to fixing the problem. Think of it like being a detective – you need to gather clues to solve the case!
•Rogue Processes:The Resource Hogs
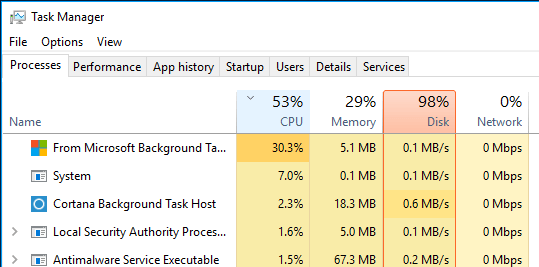
Sometimes, a single application or process can go haywire and start consuming an excessive amount of disk resources. It's like having one guest at a party who eats all the food and drinks all the wine! This could be due to a bug in the software, a misconfiguration, or even malware. Identifying and dealing with these rogue processes is crucial. Open Task Manager (Ctrl+Shift+Esc). Sort by the "Disk" column to see which processes are using the most disk resources. If you spot a process you don't recognize or that seems to be using an unusually high amount of disk, do some research to determine what it is and whether it's legitimate. If it's not essential, consider ending the process or uninstalling the associated application.
•Windows Search Indexer:The Overzealous Librarian
Windows Search Indexer is responsible for cataloging the files on your hard drive so that you can quickly find them when you search. However, sometimes it can get stuck in a loop or become corrupted, leading to excessive disk usage. It's like having a librarian who insists on alphabetizing every book in the library every five minutes! If you suspect the Search Indexer is the culprit, you can try disabling it temporarily to see if it resolves the issue. To do this, open the Services app (type "services.msc" in the Start menu). Find "Windows Search" in the list, right-click on it, and select Properties.In the "Startup type" dropdown, select Disabled.Click "Apply" and then OK.Restart your computer and see if the disk usage has improved. If it has, you can try rebuilding the search index to see if that resolves the issue permanently.
•Super Fetch/Sys Main:The Well-Intentioned But Flawed Assistant
Super Fetch (now called Sys Main) is a Windows service designed to improve application loading times by preloading frequently used applications into memory. The idea is that by anticipating what you're going to do next, Windows can make your computer feel faster. However, in some cases, Super Fetch can actually have the opposite effect, especially on systems with slower hard drives. It's like having an assistant who tries to anticipate your every need but ends up just getting in your way! If you suspect Super Fetch is causing problems, you can try disabling it. Open the Services app (type "services.msc" in the Start menu). Find "Sys Main" in the list, right-click on it, and select Properties.In the "Startup type" dropdown, select Disabled.Click "Apply" and then OK.Restart your computer and see if the disk usage has improved.
•Malware Infections:The Unwelcome Guests
Malware can wreak havoc on your system, including causing high disk usage. Some types of malware are designed to constantly write data to your hard drive, either to steal information, spread to other computers, or simply disrupt your system. It's like having unwelcome guests who trash your house and steal your valuables! Make sure you have a good antivirus program installed and that it's up-to-date. Run a full system scan to check for any malware infections. If you find anything, follow the antivirus program's instructions to remove it.
•Driver Issues:The Communication Breakdown
Drivers are the software that allows your operating system to communicate with your hardware. If a driver is outdated, corrupted, or incompatible, it can cause a variety of problems, including high disk usage. It's like having a translator who doesn't speak the same language as the person they're trying to communicate with! Check for driver updates, especially for your hard drive controller and other storage devices. You can do this through Device Manager (type "device manager" in the Start menu). Expand the "Disk drives" and "Storage controllers" sections, right-click on each device, and select "Update driver." You can also visit the manufacturer's website to download the latest drivers.
•Virtual Memory:The Overflowing Bucket
Virtual memory is a feature that allows Windows to use a portion of your hard drive as if it were RAM. This can be helpful when you're running a lot of applications or working with large files, but it can also lead to high disk usage if your system is constantly swapping data between RAM and the hard drive. It's like having a bucket that's too small for the amount of water you're trying to pour into it – the excess water spills out! Adjusting the size of your virtual memory can sometimes help alleviate high disk usage. To do this, type "advanced system settings" in the Start menu and select "View advanced system settings." In the "System Properties" window, click on the "Advanced" tab. In the "Performance" section, click on Settings.In the "Performance Options" window, click on the "Advanced" tab. In the "Virtual memory" section, click on Change.Uncheck the "Automatically manage paging file size for all drives" box. Select your system drive (usually C:). Choose "Custom size" and enter an initial size and maximum size that are appropriate for your system (a good starting point is 1.5 to 2 times the amount of RAM you have). Click "Set" and then OK.Restart your computer for the changes to take effect.
•Too Many Startup Programs:The Unnecessary Crowd
When you start your computer, a number of programs may automatically launch in the background. These startup programs can consume disk resources and slow down your system. It's like having a crowd of people all trying to squeeze through a doorway at the same time! Disable unnecessary startup programs. Open Task Manager (Ctrl+Shift+Esc), click on the "Startup" tab, and disable any programs that you don't need to run automatically. Be careful not to disable anything that's essential for your system to function properly.
Actionable Steps to Fix High Disk Usage
Alright, we've identified the usual suspects. Now, let's move on to the action plan! Here's a breakdown of how to troubleshoot and fix that pesky high disk usage.
•Run a Malware Scan
We can't stress this enough:malware is a common cause of high disk usage. A full system scan with a reputable antivirus program is the first line of defense. Many free and paid options are available. Ensure the antivirus software is updated with the latest definitions before starting the scan to maximize its effectiveness.
•*Update Device Drivers
Outdated or corrupt drivers can cause all sorts of problems, including high disk usage. Keeping your drivers up-to-date is essential for optimal system performance. Head over to Device Manager, expand the relevant categories (especially "Disk drives" and "Storage controllers"), and check for updates. Alternatively, visit the manufacturers’ websites to download the latest drivers directly.
•*Disable Super Fetch (Sys Main)
As we mentioned earlier, Super Fetch can sometimes do more harm than good. Disabling it might improve disk usage, especially on older systems. Access the Services app (services.msc), find Sys Main, and set its startup type to Disabled.Then, restart your computer.
•*Disable Windows Search
The Windows Search Indexer can be a resource hog. If you don't rely heavily on Windows Search, try disabling it to see if it makes a difference. Find "Windows Search" in the Services app and set its startup type to Disabled.
•Run Check Disk (CHKDSK)
Check Disk is a utility that scans your hard drive for errors and attempts to fix them. This can be helpful if your disk is experiencing file system corruption. Open Command Prompt as an administrator (search for "cmd," right-click, and select "Run as administrator"). Type "chkdsk /f /r" and press Enter. You'll be prompted to schedule the scan for the next system restart. Type "Y" and press Enter, then restart your computer.
•Defragment Your Hard Drive (If Applicable)
If you're using a traditional hard drive (HDD), fragmentation can slow down performance. Defragmenting your hard drive can help improve disk usage. Type "defragment" in the Start menu and select "Defragment and Optimize Drives." Select your hard drive and click Optimize.Note: this step isnotrecommended for SSDs (Solid State Drives), as it can shorten their lifespan.
•*Adjust Virtual Memory Settings
If your system is constantly swapping data between RAM and the hard drive, adjusting virtual memory settings might help. As explained earlier, navigate to the Virtual Memory settings through Advanced System Settings and customize the initial and maximum sizes.
•*Disable Unnecessary Startup Programs
Too many programs launching at startup can contribute to high disk usage. Open Task Manager, go to the "Startup" tab, and disable any programs that you don't need to run automatically.
•Reset Virtual Memory
Sometimes the virtual memory settings themselves can become corrupted. To reset them, follow these steps:Go to Advanced system settings -> Performance -> Settings -> Advanced -> Virtual memory -> Change.
Uncheck "Automatically manage paging file size for all drives".
Select your drive, select "No paging file", and click "Set".
Restart your computer.
After restart, go back to the same settings, and either enable "Automatically manage paging file size for all drives" or set a custom size.
Restart your computer again.
•Perform a Clean Boot
A clean boot starts Windows with a minimal set of drivers and startup programs. This can help you identify if a third-party application or service is causing the high disk usage. To perform a clean boot:Type "msconfig" in the Start menu and press Enter.
In the System Configuration window, go to the "Services" tab.
Check "Hide all Microsoft services" and click "Disable all".
Go to the "Startup" tab and click "Open Task Manager".
In Task Manager, disable all startup items.
Close Task Manager and click "OK" in the System Configuration window.
Restart your computer.
If the high disk usage is resolved after a clean boot, you can then re-enable services and startup programs one by one to identify the culprit.
•Upgrade to an SSD
If you're still using a traditional hard drive, upgrading to a Solid State Drive (SSD) can make a huge difference in performance. SSDs are much faster than HDDs, which can significantly reduce disk usage and improve overall system responsiveness. This might require an investment but consider it a long-term solution.
Advanced Troubleshooting Tips
Okay, so you've tried the basic troubleshooting steps, but your disk usage is still stubbornly high. Don't despair! Here are some more advanced techniques to try:
•*Monitor Resource Usage with Resource Monitor
Resource Monitor provides a more detailed view of how your system resources are being used than Task Manager. You can use it to identify specific files, processes, or services that are contributing to high disk usage. Type "resource monitor" in the Start menu and press Enter to open it. Go to the "Disk" tab to see which processes are using the most disk I/O. You can also expand the "Disk Activity" section to see which files are being accessed most frequently.
•*Analyze Event Logs
The Windows Event Logs can provide valuable clues about what's going on with your system. Check the System and Application logs for any errors or warnings that might be related to high disk usage. Type "event viewer" in the Start menu and press Enter to open it. Expand "Windows Logs" and check the "Application" and "System" logs.
•Check for Firmware Updates
Outdated firmware on your hard drive or SSD can sometimes cause performance issues. Visit the manufacturer's website to check for firmware updates for your storage devices.
•*Use Performance Counters
Performance counters are a powerful tool for monitoring system performance over time. You can use them to track disk usage, I/O rates, and other metrics to identify bottlenecks. Type "perfmon" in the Start menu and press Enter to open Performance Monitor. You can then add counters to track specific metrics related to disk usage.
•Consider a System Reset
If all else fails, you might consider resetting Windows to its factory defaults. This will erase all your data and reinstall Windows, so be sure to back up your important files first. To reset Windows, go to Settings -> Update & Security -> Recovery and click on "Get started" under "Reset this PC."
Final Checks Before Declaring Victory
Before you pop the champagne and declare victory over high disk usage, run through this checklist to ensure everything is running smoothly:
•Run a Final Malware Scan:Just to be absolutely sure.
•Monitor Disk Usage Over Time:Keep an eye on your disk usage for the next few days to ensure the problem doesn't return.
•Keep Your System Updated:Install Windows updates and driver updates regularly to maintain optimal performance.
Addressing Common Questions
Let's tackle some frequently asked questions about high disk usage in Windows 10:
•Question:Why is my disk usage always at 100% even when I'm not doing anything?
•Answer:This is a common problem in Windows 10 and can be caused by a variety of factors, including malware, driver issues, Windows Search Indexer, Super Fetch, and more. Follow the troubleshooting steps outlined in this article to identify and resolve the issue.
•Question:Will upgrading my RAM fix high disk usage?
•Answer:Upgrading your RAM can help improve overall system performance, but it may not directly address high disk usage. If your system is constantly swapping data between RAM and the hard drive due to insufficient RAM, then upgrading your RAM might help reduce disk usage. However, if the high disk usage is caused by other factors, such as malware or driver issues, then upgrading RAM won't solve the problem.
•Question:Is it safe to disable Super Fetch?
•Answer:Disabling Super Fetch is generally safe, but it might affect application loading times. If you notice a significant performance decrease after disabling Super Fetch, you can always re-enable it.
•Question:How do I know if my hard drive is failing?
•Answer:Signs of a failing hard drive include frequent crashes, slow performance, strange noises (clicking, grinding), and corrupted files. You can also use a diagnostic tool to check the health of your hard drive. Many hard drive manufacturers offer free diagnostic tools on their websites.
In this comprehensive guide, we've armed you with the knowledge and tools to conquer high disk usage in Windows 10. We started by identifying the common culprits, from resource-hungry processes to problematic services. Then, we walked you through a series of actionable steps, including running malware scans, updating drivers, disabling unnecessary services, and optimizing your system settings. We even delved into advanced troubleshooting techniques for those persistent cases. And finally, we addressed some frequently asked questions to ensure you're well-equipped to handle any future disk usage issues.
Now that you have the knowledge and tools to troubleshoot high disk usage, it's time to take action! Start by identifying the most likely cause of the problem on your system. Then, follow the steps outlined in this guide to address the issue. Remember to be patient and methodical, and don't be afraid to experiment. With a little bit of effort, you can reclaim your computer's performance and enjoy a smoother, more responsive computing experience. It’s time to reclaim your computer from the clutches of high disk usage!
With your newfound knowledge, is your computer running smoother already? Or are there other tech gremlins you're battling?
Post a Comment for "How to Troubleshoot High Disk Usage in Windows 10"
Post a Comment