How to Check Your Hard Drive for Errors in Windows 11
Is your computer acting a little wonky lately? Maybe it's slower than usual, or files are taking forever to open. Before you panic and assume the worst, there's a simple check you can perform to see if your hard drive is the culprit. Let's dive in!
We all depend on our computers to store precious memories, important documents, and everything in between. When things start to go south, it can be incredibly frustrating trying to understand what's going on and what to do to get things back on track.
This guide will walk you through how to check your hard drive for errors in Windows 11. We'll explore a couple of easy-to-use methods to help you diagnose and potentially fix any issues that might be lurking within your storage device.
So, you've learned how to use the built-in Windows tools like Check Disk (CHKDSK) and the Drive Properties window to scan your hard drive for errors. Regular checks can help you identify and address potential problems early on, safeguarding your data and keeping your system running smoothly. Remember to back up your important files before performing any disk checks, just in case!
Why Check Your Hard Drive for Errors?
Knowing why we need to perform this check is just as important as knowing how. Think of your hard drive as a vast library where all your digital books (files) are stored. Over time, these books can get misplaced, damaged, or have their index cards (metadata) messed up. Checking for errors is like a librarian going through the shelves, reorganizing books, and repairing any damage.
I once had a harrowing experience where my computer suddenly started crashing every few hours. I was a freelancer at the time, and lost work was devastating. After backing up everything I could, I ran CHKDSK and, to my surprise, it found a significant number of errors. While it took some time to complete the repair process, it ultimately saved my hard drive and, more importantly, my livelihood. Regular hard drive checks can prevent such situations by catching small issues before they snowball into major problems, potentially causing data loss or system instability. It also helps maintain the overall health and longevity of your storage device, ensuring your computer continues to run efficiently. By proactively addressing errors, you are essentially investing in the performance and reliability of your system. Neglecting your hard drive's health is like ignoring the check engine light in your car – it might seem okay for a while, but eventually, something major will break down, and the repairs will be far more costly.
Using CHKDSK to Scan for Errors
CHKDSK, short for Check Disk, is a built-in Windows utility that scans your hard drive for errors and attempts to fix them. It's like a doctor performing a comprehensive check-up on your storage device. It examines the file system's integrity, searching for logical errors such as corrupted metadata, file system errors, and bad sectors.
What exactlyis CHKDSK? Well, imagine your computer's hard drive as a meticulously organized library. Files are like books stored in specific locations, and the file system acts as the catalog, keeping track of where everything is. Over time, due to software glitches, power outages, or even just the wear and tear of constant use, this catalog can become damaged or inaccurate. CHKDSK steps in to verify the accuracy of this catalog and to identify and repair any discrepancies. The process involves checking the integrity of the file system metadata, locating bad sectors (areas on the hard drive that are no longer reliable), and attempting to repair any errors found. It’s a powerful tool that helps maintain the overall health and stability of your storage system.
The History and Myths of Disk Checking
The concept of disk checking dates back to the early days of computing. As soon as data was stored on magnetic media, the need arose to verify the integrity of that data. Early tools were rudimentary, but they laid the groundwork for the sophisticated disk checking utilities we have today.
One common myth is that running CHKDSK too often can harm your hard drive. This isn't necessarily true. While frequent checks might slightly reduce the lifespan of a traditional HDD due to the constant read/write operations, the benefits of catching and fixing errors early on generally outweigh the potential risks. SSDs are even less susceptible to wear and tear from disk checking utilities, as they have a different architecture and wear-leveling algorithms that distribute writes evenly across the drive. Another misconception is that CHKDSK can magically fix all hard drive problems. While it's effective at addressing many file system errors and bad sectors, it cannot repair physical damage or mechanical failures. If your hard drive is making unusual noises or consistently failing, it's likely a sign of a hardware issue that CHKDSK cannot resolve.
Unveiling Hidden Secrets: Advanced CHKDSK Parameters
While running CHKDSK with the default parameters is helpful, there are advanced options that can provide more thorough checks and repairs. Knowing these "hidden secrets" can significantly improve your chances of resolving complex hard drive issues.
One such secret is the `/f` parameter, which tells CHKDSK to fix any errors it finds. Without this parameter, CHKDSK will simply scan the drive and report any errors, but it won't attempt to repair them. Another powerful parameter is `/r`, which locates bad sectors and recovers readable information. This parameter is particularly useful if you suspect that your hard drive is developing bad sectors due to physical wear and tear. Keep in mind that the `/r` parameter can take a considerable amount of time to complete, especially on larger drives. For those seeking the most comprehensive scan, the `/x` parameter forces the volume to dismount first, ensuring that CHKDSK has exclusive access to the drive. This is essential for performing repairs on the system drive (usually C:), as Windows needs to dismount the drive to prevent any conflicts.
Recommendations for Regular Disk Maintenance
Proactive maintenance is crucial to keeping your hard drive healthy and your data safe. Think of it as routine car maintenance – regular oil changes and tire checks can prevent major breakdowns down the road. Similarly, regular disk maintenance can help you identify and address potential problems before they lead to data loss or system instability.
So, what are the recommended practices? First and foremost, schedule regular CHKDSK scans. Depending on your usage patterns, running CHKDSK every few months is a good starting point. If you frequently work with large files, install and uninstall a lot of software, or experience frequent system crashes, you might want to increase the frequency of your scans. Another important recommendation is to keep your operating system and drivers up to date. Software updates often include bug fixes and performance enhancements that can improve the overall stability of your system and prevent file system errors. It's also a good idea to defragment your hard drive regularly, especially if you're using a traditional HDD. Defragmentation reorganizes the files on your drive, making it easier for your computer to access them and improving performance. While SSDs don't require defragmentation, it's still important to ensure that TRIM is enabled. TRIM is a command that tells the SSD which data blocks are no longer in use and can be erased, which helps maintain performance and extend the lifespan of the drive.
Interpreting CHKDSK Results: Understanding Error Codes
After running CHKDSK, it's crucial to understand the results and take appropriate action if any errors are found. CHKDSK provides a detailed report outlining the type of errors detected and whether it was able to repair them.
One common error message is "File system errors corrected." This indicates that CHKDSK found and fixed logical errors in the file system, such as corrupted metadata or incorrect file pointers. In most cases, this is a positive outcome, and you can simply restart your computer and continue using it as normal. However, if you see this message repeatedly, it might indicate an underlying issue that needs further investigation. Another common message is "Bad sectors found." This indicates that CHKDSK has detected areas on the hard drive that are no longer reliable. While CHKDSK can mark these sectors as unusable, preventing data from being written to them, the presence of bad sectors is often a sign of a failing hard drive. If you see this message frequently, it's a good idea to back up your data immediately and consider replacing your hard drive.
Tips for Optimizing Hard Drive Performance
Beyond checking for errors, there are several things you can do to optimize your hard drive's performance and keep your system running smoothly. Think of it as fine-tuning a car engine – small adjustments can make a big difference in performance and efficiency.
One of the most effective tips is to free up disk space. A full hard drive can significantly slow down your computer, as it becomes more difficult for the system to find and access files. Regularly delete unnecessary files, uninstall unused programs, and move large files to an external drive or cloud storage. Another important tip is to disable unnecessary startup programs. Many programs automatically launch when you start your computer, consuming valuable system resources and slowing down the boot process. Use the Task Manager to disable programs that you don't need to run automatically.
Backing Up Your Data: A Crucial Precaution
Before you eventhinkabout running any disk checks or making any changes to your hard drive, it's absolutely essential to back up your data. This is like wearing a seatbelt before driving – it's a simple precaution that can save you from a lot of trouble in case something goes wrong.
Why is backing up so important? Well, while CHKDSK is generally safe, there's always a small chance that it could encounter a critical error during the repair process, potentially leading to data loss. By backing up your data beforehand, you can rest assured that your precious files are safe, even if something unexpected happens. There are several ways to back up your data. You can use an external hard drive, a USB flash drive, or a cloud storage service like Google Drive, Dropbox, or One Drive. Choose the method that best suits your needs and budget.
Fun Facts About Hard Drives and Data Storage
Did you know that the first hard drive, invented by IBM in 1956, was the size of a refrigerator and could only store 5 MB of data? That's less than a single high-resolution photo today!
Here's another fun fact: the term "hard drive" comes from the fact that the platters inside are made of rigid material, unlike the flexible magnetic tape used in earlier storage devices. Over the years, hard drive technology has evolved dramatically, with storage capacities increasing exponentially and sizes shrinking to fit in our pockets. Today, you can buy a tiny micro SD card that can store hundreds of gigabytes of data, which is mind-boggling compared to the storage capabilities of early hard drives.
Step-by-Step Guide to Checking Your Drive in Windows 11
Alright, let's get down to the nitty-gritty. Here’s a detailed guide to checking your hard drive for errors in Windows 11:
1.Open File Explorer: You can do this by clicking the File Explorer icon on your taskbar or by pressing the Windows key + E.
2.Locate Your Hard Drive: In the left pane of File Explorer, click "This PC." You'll see a list of your drives, including your hard drive (usually labeled as C:).
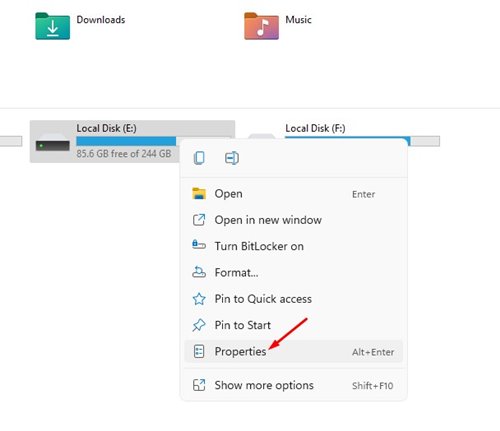
3.Open Properties: Right-click on the drive you want to check and select Properties.4.Go to the Tools Tab: In the Properties window, click on the "Tools" tab.
5.Click "Check": Under the "Error checking" section, click the "Check" button.
6.Scan Drive: Windows will now scan your drive for errors. If it finds any, it will prompt you to fix them. You may need to restart your computer to complete the process.
What If CHKDSK Finds Errors It Can't Fix?
Sometimes, CHKDSK might encounter errors that it simply can't fix. This can be a sign of a more serious problem with your hard drive, such as physical damage or a corrupted file system.
If CHKDSK reports unrecoverable errors, the first thing you should do is back up your data immediately. As mentioned earlier, this is crucial to prevent data loss in case your hard drive fails completely. Once you've backed up your data, you can try a more advanced disk repair tool, such as a third-party disk utility or a data recovery service. These tools often have more sophisticated algorithms for repairing damaged sectors and recovering lost files. However, keep in mind that these tools are not always successful, and they can be expensive.
Listicle: Five Signs Your Hard Drive Might Be Failing
Knowing the warning signs of a failing hard drive can help you take proactive steps to prevent data loss and system downtime. Here are five telltale signs that your hard drive might be on its last legs:
1.Slow Performance: If your computer is taking longer than usual to boot up, open files, or run programs, it could be a sign that your hard drive is struggling to read and write data.
2.Frequent Crashes: If your computer is crashing frequently, especially with blue screen errors, it could indicate that your hard drive is experiencing errors or bad sectors.
3.Unusual Noises: Clicking, grinding, or whirring noises coming from your computer case can be a sign of mechanical failure in the hard drive.
4.Missing or Corrupted Files: If you're noticing that files are disappearing or becoming corrupted, it could be a sign that your hard drive is developing bad sectors.
5.CHKDSK Errors: If CHKDSK is consistently finding and fixing errors on your hard drive, it could indicate that the drive is starting to fail.
Question and Answer Section About Checking Your Hard Drive For Errors
Q: How often should I check my hard drive for errors?
A: It's generally recommended to check your hard drive every few months, or more frequently if you experience any performance issues or suspect that your drive is failing.
Q: Will checking my hard drive for errors erase my data?
A: CHKDSK is designed to repair errors without deleting your data, but there's always a small risk of data loss. It's always a good idea to back up your data before running CHKDSK, just in case.
Q: Can I use CHKDSK on an SSD?
A: Yes, you can use CHKDSK on an SSD. However, SSDs are less prone to file system errors than traditional HDDs, so you may not need to run CHKDSK as frequently.
Q: What if CHKDSK finds errors it can't fix?
A: If CHKDSK finds errors it can't fix, it could be a sign of a more serious problem with your hard drive. You may need to try a more advanced disk repair tool or consider replacing your hard drive.
Conclusion of How to Check Your Hard Drive for Errors in Windows 11
Regularly checking your hard drive for errors is a simple yet crucial task that can help protect your data and keep your Windows 11 system running smoothly. By following the steps outlined in this guide, you can identify and address potential problems early on, preventing data loss and system instability. Remember to back up your data before running any disk checks, and consider using more advanced disk repair tools if CHKDSK finds errors it can't fix. With a little bit of proactive maintenance, you can ensure the health and longevity of your hard drive and enjoy a smoother, more reliable computing experience.
Post a Comment for "How to Check Your Hard Drive for Errors in Windows 11"
Post a Comment