How to Format a Hard Drive or USB Drive in Windows 11
Step One:Windows 11 Hard Drive and USB Formatting: A Simple Guide.
Step Two:
Hey there, tech-savvy friends! Ever felt like your computer's storage is a chaotic closet? Files scattered everywhere, programs hogging space, and that one embarrassing folder you'd rather forget about lurking in the shadows? We’ve all been there. It’s like moving into a new house but never unpacking – eventually, you can't even find your keys, let alone that important document you need for work.
Let's face it, our hard drives and USB drives are the digital equivalent of that messy closet. They accumulate junk over time, slowing down our systems and making it harder to find what we actually need. Think about that old USB drive you found in a drawer. You probably haven't used it in years, but it’s still clinging to those ancient vacation photos and that half-finished school project from 2010. It’s digital hoarding, and it’s time for a cleanse!
Now, you might be thinking, "Why bother formatting? Can't I just delete the files?" Well, deleting files is like sweeping the dirt under the rug. It might look clean on the surface, but the underlying issues remain. Formatting, on the other hand, is like hiring a professional organizer to completely overhaul your closet. It wipes the drive clean, reorganizes the space, and gets it ready for a fresh start.
Plus, formatting can be a lifesaver when you're dealing with a corrupted drive or preparing to sell or donate your computer. It ensures that your personal data is completely erased, protecting your privacy and giving you peace of mind. Imagine selling your laptop without formatting the hard drive – it's like leaving your diary open for anyone to read!
But here's the thing: formatting can seem a little intimidating, especially if you're not a tech whiz. All those technical terms like "NTFS" and "ex FAT" can make your head spin. It’s like trying to decipher a foreign language – you know the words are there, but you have no idea what they mean.
That's where this guide comes in. We're going to break down the process of formatting a hard drive or USB drive in Windows 11 into simple, easy-to-follow steps. No confusing jargon, no complicated procedures – just clear, straightforward instructions that anyone can understand.
Think of it as your personal digital decluttering guide. We'll walk you through everything you need to know, from choosing the right file system to backing up your important data. By the end of this article, you'll be able to format your drives with confidence, freeing up space, improving performance, and protecting your privacy.
So, are you ready to take control of your digital storage and transform that messy closet into a well-organized haven? Stick around, because we're about to dive into the world of Windows 11 formatting and show you just how easy it can be! What if I told you there's a secret trick to making your computer run faster than ever before? Keep reading to find out!
Step Three:
Alright, let's get down to business! You've decided to format that drive, and that's a great first step. But before you go all trigger-happy with the format button, it’s crucial to understand what you're doing and why.
The Main Issue: Why Format?
The main reason people format drives is to erase all the data on them. But it's more than just deleting files. Formatting does the following: Erases All Data: Completely wipes the drive clean, removing all files and folders. Resets the File System: Re-establishes the way data is organized on the drive. This can fix errors, improve performance, and ensure compatibility with different operating systems. Prepares for a Fresh Start:Makes the drive ready for new files and programs. It’s like giving your drive a clean slate.
Now, let’s dive into the actual steps of formatting in Windows 11.Part 1: Backing Up Your Data – Seriously, Don't Skip This!
This is the most important step, friends. Formatting erases everything, so if you have anything important on the drive, back it up first! Imagine accidentally formatting your drive without backing up your family photos – disaster!
Choose Your Backup Method:
External Hard Drive: Copy your files to another external hard drive. This is a reliable and straightforward method.
Cloud Storage: Use services like One Drive, Google Drive, or Dropbox to upload your files to the cloud. This is great for accessibility and off-site backup.
USB Drive: For smaller amounts of data, a USB drive can work, but make sure it has enough space! Select What to Backup:
Important Documents: Anything you can't afford to lose – work files, tax returns, etc.
Photos and Videos: Precious memories you want to keep forever.
Music: Your carefully curated playlists.
Application Data: Settings and data for programs you use. Some programs save data in obscure locations, so do some research! Verify Your Backup:
Double-Check: Make sure all your important files are actually in the backup.
Test Restore: Try restoring a few files from the backup to make sure it works properly.
Part 2: Formatting the Drive – Let's Get to It!
Okay, with your data safely backed up, let's format that drive!
Open File Explorer:
Click the File Explorer icon on your taskbar, or press the Windows key + E. Locate Your Drive:
Find the drive you want to format in the left-hand pane. It might be listed under "This PC" or "Devices and drives." Right-Click and Select "Format":
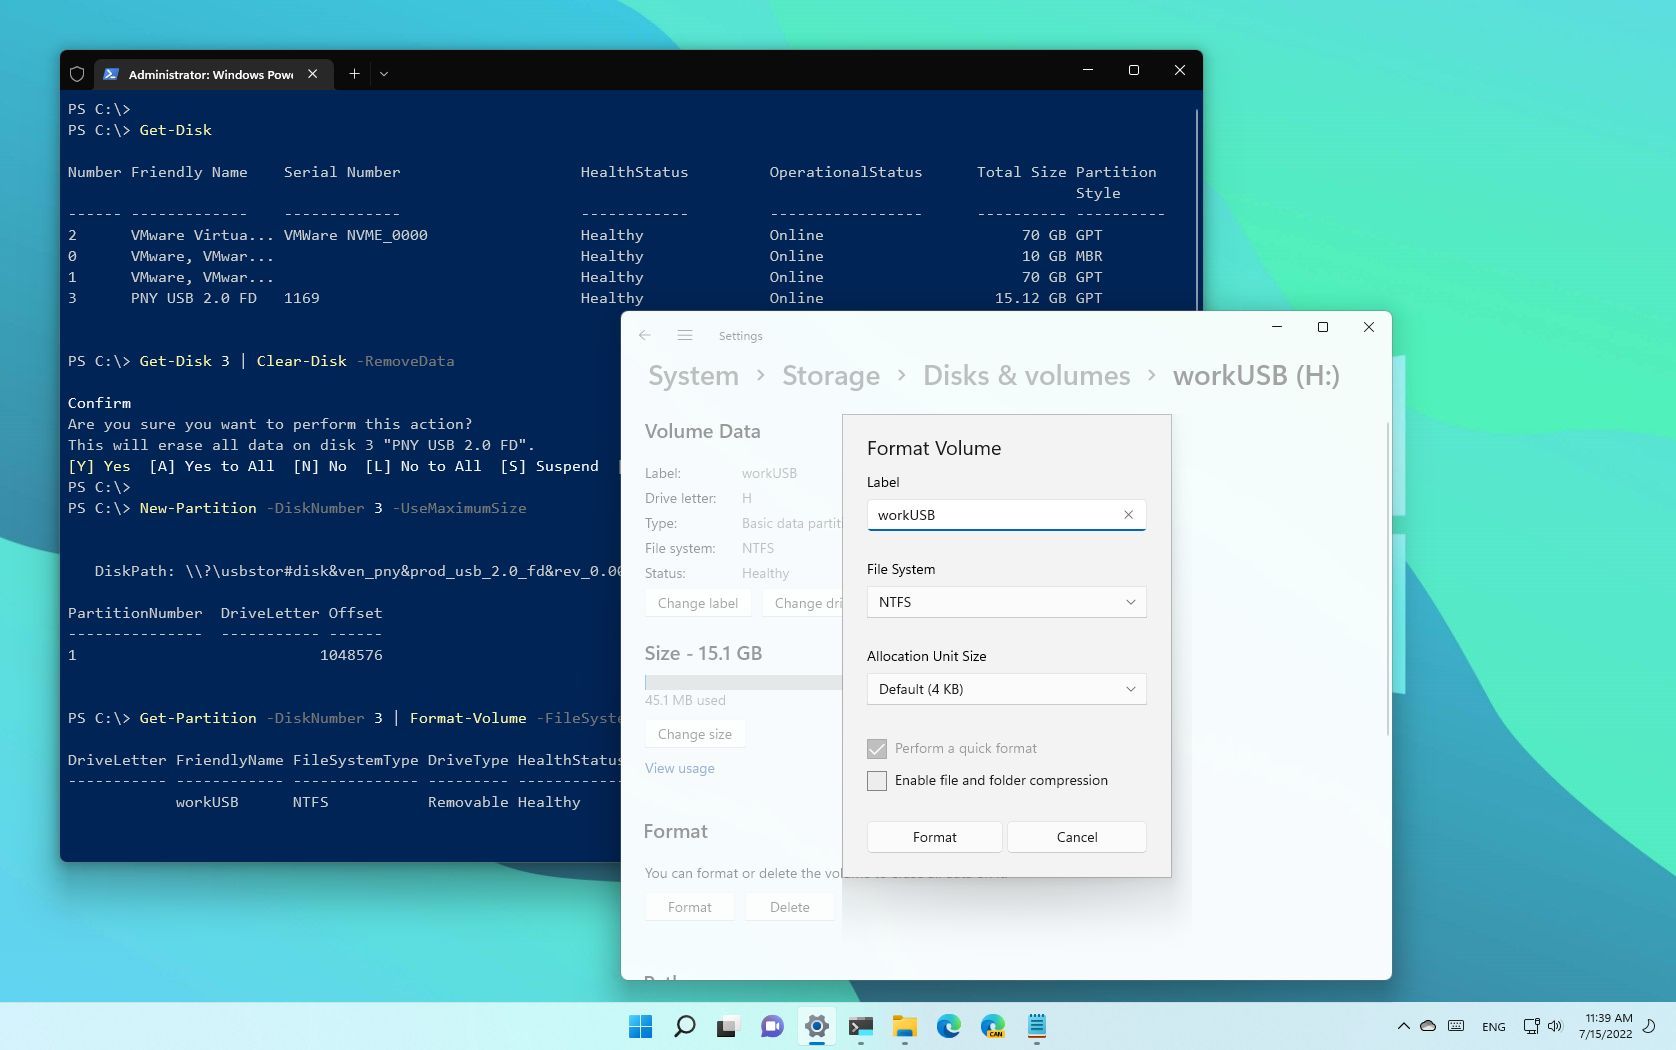
Right-click on the drive and select "Format" from the context menu. This opens the Format dialog box. Choose Your Settings:
Capacity: This should be pre-filled and match the size of your drive.
File System: This is important! Here are the most common options: NTFS: The standard file system for Windows. Use this for internal hard drives and external drives that you primarily use with Windows.
ex FAT: A modern file system that's compatible with both Windows and mac OS. Use this for USB drives and external drives that you want to use with different operating systems.
FAT32: An older file system that's compatible with almost everything, but it has a 4GB file size limit. Not recommended unless you have a specific reason to use it.
Allocation Unit Size: Leave this at the default setting (usually "Default allocation size").
Volume Label: This is the name of your drive. Give it a descriptive name like "Backup Drive" or "USB Drive."
Quick Format: Check this box for a faster format. It only erases the file system, not the actual data. If you want a more thorough wipe, uncheck this box, but be aware that it will take much longer. Start the Formatting Process:
Click the "Start" button. A warning message will appear, reminding you that all data will be erased. Double-check that you've backed up everything and then click OK.Wait for the Formatting to Complete:
The formatting process can take anywhere from a few seconds to several hours, depending on the size of the drive and whether you chose a quick format. A progress bar will show you how far along it is. Done! Once the formatting is complete, you'll see a message confirming that the drive has been formatted. Click "OK" to close the dialog box.
Part 3:Dealing with Problem Drives – When Things Go Wrong
Sometimes, formatting doesn't go as smoothly as planned. Here are a few common problems and how to fix them: "Windows was unable to complete the format" Error:
Close All Programs: Make sure no programs are using the drive.
Restart Your Computer: Sometimes a simple restart can fix the problem.
Try a Different Formatting Tool: Use a third-party formatting tool like Rufus or Disk Part (command-line tool).
Check for Physical Damage: If the drive is physically damaged, it might not be possible to format it. Drive is Write-Protected:
Check the Physical Switch: Some USB drives have a physical switch that enables write protection. Make sure it's in the unlocked position.
Use Disk Part: Open Command Prompt as an administrator and type the following commands: `diskpart`
`list disk`
`select disk #` (Replace # with the disk number of your drive)
`attributes disk clear readonly`
`exit` Drive is Corrupted:
Run CHKDSK: Open Command Prompt as an administrator and type `chkdsk /f X:` (Replace X with the drive letter). This will check the drive for errors and attempt to fix them.
Part 4: Advanced Formatting Options – For the Tech-Savvy
If you're feeling adventurous, here are a few advanced formatting options: Using Disk Part (Command Line):
Disk Part is a powerful command-line tool that allows you to perform more advanced formatting tasks. It's useful for dealing with stubborn drives that can't be formatted using the GUI.
Open Command Prompt as Administrator:
Type `diskpart` and press Enter.
`list disk` (Identify the disk number of your drive)
`select disk #` (Replace # with the correct disk number)
`clean` (This will completely wipe the drive)
`create partition primary`
`format fs=ntfs quick` (Or `format fs=exfat quick` if you prefer)
`assign letter=X` (Replace X with a desired drive letter)
`exit` Secure Erase:
For highly sensitive data, a regular format might not be enough. Secure erase methods overwrite the data multiple times, making it virtually impossible to recover. Some SSDs have built-in secure erase functions, or you can use third-party tools like DBAN (Darik's Boot and Nuke).
Remember, formatting is a powerful tool. Use it wisely, always back up your data, and don't be afraid to experiment! With a little knowledge and the right tools, you can keep your drives clean, organized, and running smoothly. Good luck, and happy formatting!
Step Four:
Well, friends, we've reached the end of our journey through the world of Windows 11 hard drive and USB drive formatting. We've covered everything from the basics of why you might need to format a drive to the more advanced techniques for dealing with stubborn or corrupted storage devices.
To recap, we started by emphasizing the importance of backing up your databeforeyou do anything else. This is absolutely crucial, as formatting will erase everything on the drive. We then walked you through the step-by-step process of formatting a drive in Windows 11, explaining the different file system options and settings. Finally, we explored some troubleshooting tips for dealing with common formatting problems and even touched on advanced techniques like using Disk Part and secure erase methods.
Now that you're armed with this knowledge, it's time to take action! If you have a cluttered hard drive, a sluggish USB drive, or simply want to securely erase your data before selling or donating a device, don't hesitate to put these skills to use.
Your Call to Action
Go ahead and identify one drive that you want to format. Back up any important data, and then follow the steps outlined in this guide to give it a fresh start. You'll be amazed at how much cleaner and more efficient your storage system can be! Consider it your digital spring cleaning, and the satisfaction that comes with it is real!
And remember, we're all here to learn and grow together. If you encounter any problems or have any questions along the way, don't hesitate to reach out. There are plenty of resources available online, and we’re always happy to offer guidance and support.
So, go forth and conquer your digital clutter! With a little effort and the right tools, you can keep your drives running smoothly and protect your valuable data. You've got this! You can optimize your computer storage system today, and enjoy the benefits of a cleaner, faster, and more secure digital life. Embrace the power of formatting, and you'll be amazed at what you can achieve! Every clean drive is a step towards optimal performance. Now, is there anything holding you back from experiencing the joy of a freshly formatted drive? Think about it, and take that step! You will not regret it!
Post a Comment for "How to Format a Hard Drive or USB Drive in Windows 11"
Post a Comment