How to Use the Windows 10 Search Indexing Options
Unlock Lightning-Fast Searches: Mastering Windows 10 Indexing Options
Hey there, tech enthusiasts! Ever felt like your Windows 10 search bar is stuck in slow motion? You type in a file name, and you're left waiting... and waiting... while your computer rummages through every nook and cranny? We've all been there. It's like waiting for dial-up internet to connect – a true test of patience!
Think about it: you’re in a rush to find that crucial presentation five minutes before a big meeting. Or perhaps you desperately need that one recipe you saved ages ago, and dinner time is looming. The frustration is real, isn’t it? It's like being in a library where the librarian has mysteriously disappeared, leaving you to sift through endless shelves yourself.
Now, what if I told you there's a secret weapon hidden within Windows 10 that can dramatically speed up your searches? A way to make your computer’s search function feel like a high-speed race car instead of a rusty old bicycle? We’re talking about the Windows 10 Search Indexing Options.
This feature is like a diligent little assistant that catalogs all your files, making it incredibly quick and easy for your computer to find exactly what you're looking for. It's the unsung hero of Windows 10, working tirelessly behind the scenes to keep your digital life organized.
But here's the thing: many of us barely know this feature exists, let alone how to use it effectively. It's like having a super-powerful tool in your toolbox that you never learned how to operate. And that’s a shame, because mastering the Indexing Options can save you tons of time and frustration.
So, how do you unleash the power of the Windows 10 Search Indexing Options? How do you customize it to fit your specific needs and ensure that it's working optimally? Don't worry, we're about to dive deep into the world of indexing, and I promise it's not as complicated as it sounds.
In this article, we’ll break down everything you need to know about the Windows 10 Search Indexing Options. We'll explore what it is, why it’s important, and, most importantly, how to use it to make your searches lightning fast. We’ll walk through the settings step by step, show you how to add or remove locations from the index, and even troubleshoot common issues.
Are you ready to transform your sluggish search experience into a seamless and efficient process? Let's get started, and by the end of this article, you'll be a Windows 10 indexing master!
Understanding Windows 10 Search Indexing: The Basics
Before we dive into the "how," let's quickly cover the "what" and the why.What exactly is search indexing, and why should you care?
What is Search Indexing?
Think of search indexing like creating an index for a book. Instead of reading every single page to find a specific topic, you can simply consult the index, which lists keywords and their corresponding page numbers. This allows you to jump directly to the information you need.
Similarly, Windows 10 search indexing creates a database of your files and their contents. This database, or "index," allows the search function to quickly locate files based on keywords, file names, or even content within the files themselves. Without indexing, your computer would have to search through every single file and folder on your hard drive every time you perform a search – a process that can be incredibly slow, especially if you have a lot of files.
Why is it Important?
The benefits of search indexing are numerous:
• Speed: The most obvious benefit is the dramatic increase in search speed. Indexing allows you to find files almost instantly, saving you valuable time and reducing frustration.
• Efficiency: By indexing only the locations you specify, you can optimize the process and avoid unnecessary indexing of files you rarely search.
• Productivity: Faster searches mean you can find the information you need quickly and get back to work. This can significantly boost your overall productivity.
• Improved User Experience: A responsive search function makes using your computer much more enjoyable. No more waiting around for slow searches!
Step-by-Step Guide: Mastering the Windows 10 Indexing Options
Now that you understand the basics, let's get into the practical steps of using the Windows 10 Search Indexing Options.
• Accessing the Indexing Options: The first step is to find the Indexing Options panel. There are several ways to do this:
• Using the Search Bar: The easiest way is to simply type "Indexing Options" into the Windows 10 search bar (located next to the Start button) and select "Indexing Options" from the search results.
• Through the Control Panel: You can also access the Indexing Options through the Control Panel. To do this, open the Control Panel, select "Indexing Options," or type "Indexing Options" into the search bar within the Control Panel.
• Using Settings App: Alternatively, go to Settings > Search > Searching Windows. Here, you'll find options related to indexing, though it may not lead directly to the traditional Indexing Options panel.
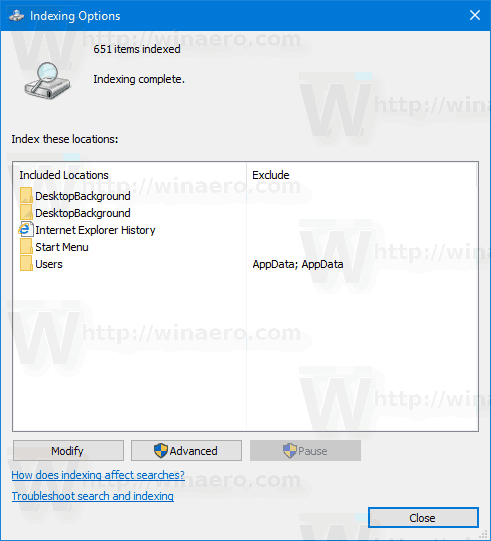
• Understanding the Indexing Options Panel: Once you've opened the Indexing Options panel, you'll see a window with a list of indexed locations, the number of items indexed, and several buttons:
• Indexed Locations: This list shows the folders and locations that are currently being indexed. By default, Windows 10 indexes common locations like your user profile folder (which includes Documents, Pictures, Music, and Videos), the Start menu, and Microsoft Outlook (if you use it).
• Number of Items Indexed: This shows the total number of files and items that have been indexed.
• Modify: This button allows you to add or remove locations from the index.
• Advanced: This button opens the Advanced Options panel, which allows you to customize indexing settings, such as file types to index and troubleshooting options.
• Pause: This button allows you to temporarily pause the indexing process. This can be useful if indexing is slowing down your computer's performance.
• Adding or Removing Locations: Customizing the indexed locations is crucial for optimizing the indexing process. You want to ensure that important locations are indexed while excluding unnecessary ones.
• Click the "Modify" Button: In the Indexing Options panel, click the "Modify" button. This will open the "Indexed Locations" window.
• Expanding Locations: In the "Indexed Locations" window, you'll see a hierarchical list of locations on your computer. You can expand each location by clicking the arrow next to it to view its subfolders.
• Selecting Locations to Index: To add a location to the index, simply check the box next to it. To remove a location from the index, uncheck the box.
• Adding Network Locations: By default, network locations are not indexed. If you want to index files on a network drive, you can add the network location by typing its path directly into the "Summary of selected locations" box at the bottom of the "Indexed Locations" window.
• Applying Changes: Once you've made your changes, click "OK" to save them. The indexing process will automatically update to reflect the new locations.
• Advanced Indexing Options: The Advanced Options panel provides more granular control over the indexing process.
• Accessing the Advanced Options: In the Indexing Options panel, click the "Advanced" button. This will open the "Advanced Options" window.
• Index Settings Tab: This tab allows you to change the location of the index file (where the index database is stored) and troubleshoot indexing issues.
• Index Location: You can change the location of the index file if you want to store it on a different drive. This can be useful if you have limited space on your primary drive.
• Troubleshooting: The "Troubleshooting" section includes a "Rebuild" button. Clicking this button will completely rebuild the index from scratch. This can be useful if you're experiencing issues with search results or if the index has become corrupted. Be warned, this can take a while.
• File Types Tab: This tab allows you to specify which file types should be indexed and how they should be indexed.
• Adding File Types: You can add new file types to the index by typing the file extension into the "Add new extension to list" box and clicking Add.• Changing Indexing Method: For each file type, you can choose whether to index only the file properties (like file name, date, and size) or both the file properties and the file contents. Indexing the file contents allows you to search for text within the files themselves, but it also increases the size of the index and can slow down the indexing process.
• Troubleshooting Indexing Issues: Sometimes, the indexing process can encounter problems. Here are some common issues and how to resolve them:
• Slow Indexing: If indexing is taking a long time, it could be due to several factors:
• Large Number of Files: Indexing a large number of files can take time. Be patient and allow the process to complete.
• Limited System Resources: Indexing can consume system resources, such as CPU and memory. Close unnecessary applications to free up resources.
• Hard Drive Issues: A fragmented or damaged hard drive can slow down indexing. Run a disk defragmenter or check your hard drive for errors.
• Inaccurate Search Results: If search results are inaccurate or incomplete, the index may be corrupted. Try rebuilding the index.
• Indexing Not Working: If indexing is not working at all, ensure that the Windows Search service is running. To do this, press Windows key + R, type "services.msc," and press Enter. In the Services window, find the "Windows Search" service, right-click it, and select "Start" if it is not running.
• High CPU Usage: If the indexing process is causing high CPU usage, try pausing the indexing process during peak hours and scheduling it to run during off-peak hours.
Optimizing Indexing for Performance
To get the most out of the Windows 10 Search Indexing Options, consider these optimization tips:
• Index Only What You Need: Avoid indexing locations that you rarely search. The more locations you index, the larger the index file and the longer the indexing process will take.
• Choose the Right File Types: Only index the file types that you need to search within. If you don't need to search for text within certain file types, index only their properties.
• Schedule Indexing: Schedule indexing to run during off-peak hours, such as overnight or when you're not using your computer. This will minimize the impact on your computer's performance.
• Monitor Index Size: Keep an eye on the size of the index file. If it becomes too large, consider reducing the number of indexed locations or file types.
• Use Solid State Drives (SSDs): If possible, store your index file on a solid-state drive (SSD). SSDs offer much faster read and write speeds than traditional hard drives, which can significantly improve indexing performance.
• Rebuild the Index Regularly: Rebuilding the index periodically can help to keep it optimized and prevent corruption.
Real-World Examples
Let's look at some real-world scenarios to illustrate how the Windows 10 Search Indexing Options can be used effectively:
• Scenario 1: The Busy Professional: A busy professional who works with a large number of documents and emails can use the Indexing Options to quickly find important information. They can index their Documents folder, Outlook data files, and any other locations where they store work-related files. They can also customize the file types to index only the ones they commonly use, such as .docx, .xlsx, and .pdf.
• Scenario 2: The Student: A student can use the Indexing Options to quickly find lecture notes, research papers, and other academic materials. They can index their Documents folder, as well as any folders where they store downloaded files or files shared by their instructors.
• Scenario 3: The Creative Professional: A creative professional, such as a photographer or video editor, can use the Indexing Options to quickly find images, videos, and other media files. They can index their Pictures and Videos folders, as well as any external drives where they store their media files. They can also customize the file types to index only the ones they commonly use, such as .jpg, .png, .mp4, and .mov.
Expert Tips and Tricks
Here are some additional tips and tricks to help you get the most out of the Windows 10 Search Indexing Options:
• Use Search Operators: Windows 10 supports a variety of search operators that can help you refine your searches. For example, you can use the "size:" operator to search for files of a specific size, or the "date:" operator to search for files modified within a specific date range.
• Pin Frequently Used Folders to Quick Access: Pinning frequently used folders to Quick Access in File Explorer can make it even easier to find the files you need.
• Use Cortana Search: Cortana, the Windows 10 virtual assistant, can also use the index to quickly find files and information.
• Keep Windows 10 Updated: Microsoft regularly releases updates to Windows 10 that can improve the performance and stability of the search indexing feature.
Common Misconceptions
Let's debunk some common misconceptions about Windows 10 Search Indexing:
• Misconception: Indexing Slows Down My Computer: While indexing can consume system resources, it generally doesn't have a significant impact on performance, especially on modern computers. In fact, indexing can actually improve performance by making searches faster.
• Misconception: Indexing Indexes Everything: By default, Windows 10 only indexes certain locations and file types. You can customize the indexing settings to include or exclude specific locations and file types.
• Misconception: Indexing is Only for Advanced Users: The Windows 10 Search Indexing Options are easy to use and can benefit users of all skill levels.
Future Trends
The future of search indexing is likely to involve even more advanced features and capabilities. Some potential trends include:
• AI-Powered Indexing: AI could be used to automatically optimize the indexing process, identify important files, and improve search accuracy.
• Cloud-Based Indexing: Cloud-based indexing could allow you to search for files across multiple devices and platforms seamlessly.
• Contextual Search: Contextual search could take into account your current activity and location to provide more relevant search results.
Questions & Answers
• Q: How often should I rebuild my search index?
• A: You only need to rebuild your search index if you're experiencing problems with search results, such as missing files or inaccurate results. A good rule of thumb is to rebuild it every few months or if you make significant changes to your file structure.
• Q: Will indexing my network drives slow down my network?
• A: Indexing network drives can potentially impact network performance, especially if you have a large number of files. Consider indexing network drives during off-peak hours to minimize the impact.
• Q: How do I know if the indexing process is complete?
• A: In the Indexing Options panel, you'll see a message indicating whether indexing is complete. If indexing is in progress, you'll see a progress bar and an estimated time remaining.
• Q: Can I exclude specific folders within an indexed location?
• A: Yes, you can exclude specific folders within an indexed location by unchecking the box next to the folder in the "Indexed Locations" window.
So, there you have it, friends! You're now armed with the knowledge to take control of your Windows 10 search experience. We’ve covered everything from understanding what indexing is and why it matters, to mastering the Indexing Options panel and troubleshooting common issues. We've explored real-world scenarios and delved into expert tips and tricks. It's time to say goodbye to frustratingly slow searches and hello to lightning-fast results!
Now, here's your call to action: take a few minutes right now to open up your Windows 10 Indexing Options and customize them to fit your specific needs. Add the locations you frequently search, remove the ones you don’t, and fine-tune those file types. You’ll be amazed at the difference it makes!
Remember, a little effort in optimizing your indexing settings can save you countless hours of frustration in the long run. So, go ahead, unleash the power of the Windows 10 Search Indexing Options, and experience the joy of instant search results!
Now, tell me, what's the first file you're going to search for with your newly optimized indexing? Let me know in the comments below! Keep exploring, keep learning, and keep making your digital life easier!
Post a Comment for "How to Use the Windows 10 Search Indexing Options"
Post a Comment