How to Use the Windows 11 Troubleshooters for Specific Hardware
Unlocking Hardware Harmony: Mastering Windows 11 Troubleshooters
Hey there, tech enthusiasts! Ever feel like your computer is speaking a language you just don't understand? Like when your printer decides to stage a rebellion and refuses to print that crucial document five minutes before your deadline? Or perhaps your Bluetooth headphones are playing hard to get, stubbornly refusing to connect no matter how many times you click that "pair" button? We've all been there, staring blankly at our screens, wondering if we accidentally enrolled in a computer science degree we didn't sign up for.
Let's face it, computers are amazing… until they're not. That's when they become frustrating metal boxes that test our patience and sanity. We’ve all experienced the silent scream into a pillow after hours of battling a malfunctioning device. And who hasn't frantically Googled "why won't my [insert device here] work?!" at 3 AM, hoping for a miracle cure?
But what if I told you that Windows 11 has a secret weapon built right in – a team of tiny digital detectives ready to sniff out those pesky hardware problems and restore order to your digital kingdom? We’re talking about the humble, yet powerful, troubleshooters. These aren't your grandma's troubleshooters; they're smarter, more efficient, and ready to tackle a whole range of hardware headaches. They are designed to automatically diagnose and fix common issues, saving you time, energy, and potentially a trip to the dreaded tech support line (or worse, having to explain the problem to that one tech-savvy friend who always makes you feel inadequate!).
Think of them as tiny digital mechanics living inside your computer, constantly monitoring your hardware for signs of trouble. When something goes wrong, they jump into action, running diagnostics, checking drivers, and even making subtle tweaks to get things working smoothly again. They're like the unsung heroes of the digital world, quietly keeping our computers running smoothly behind the scenes.
But here's the thing: many of us don't even know these troubleshooters exist, or if we do, we're not quite sure how to unleash their problem-solving power. That's where this guide comes in. We're going to dive deep into the world of Windows 11 troubleshooters, specifically focusing on how to use them for specific hardware issues. Forget complicated jargon and confusing menus. We’ll break it all down into easy-to-follow steps, so you can become a master of hardware troubleshooting in no time.
Imagine the satisfaction of fixing a printer issue yourself, without having to call for backup. Picture the smug grin on your face when you get your Bluetooth headphones working flawlessly, silencing the inner voice that whispered, "Maybe I should just buy new ones."
So, are you ready to become a hardware troubleshooting ninja? Let’s unlock the secrets of Windows 11 troubleshooters and turn those tech headaches into triumphs. Stick around, because we’re about to embark on a journey that will empower you to take control of your tech and keep your hardware humming happily. Trust me, your future self (and your wallet) will thank you!
Harnessing the Power of Windows 11 Hardware Troubleshooters
Windows 11 comes equipped with a suite of built-in troubleshooters designed to automatically diagnose and resolve common hardware problems. Using these tools can save you time and frustration by identifying and fixing issues before they escalate. Let's explore how to access and utilize these troubleshooters effectively.
Accessing the Troubleshooters
There are a couple of easy ways to get to the troubleshooters panel.
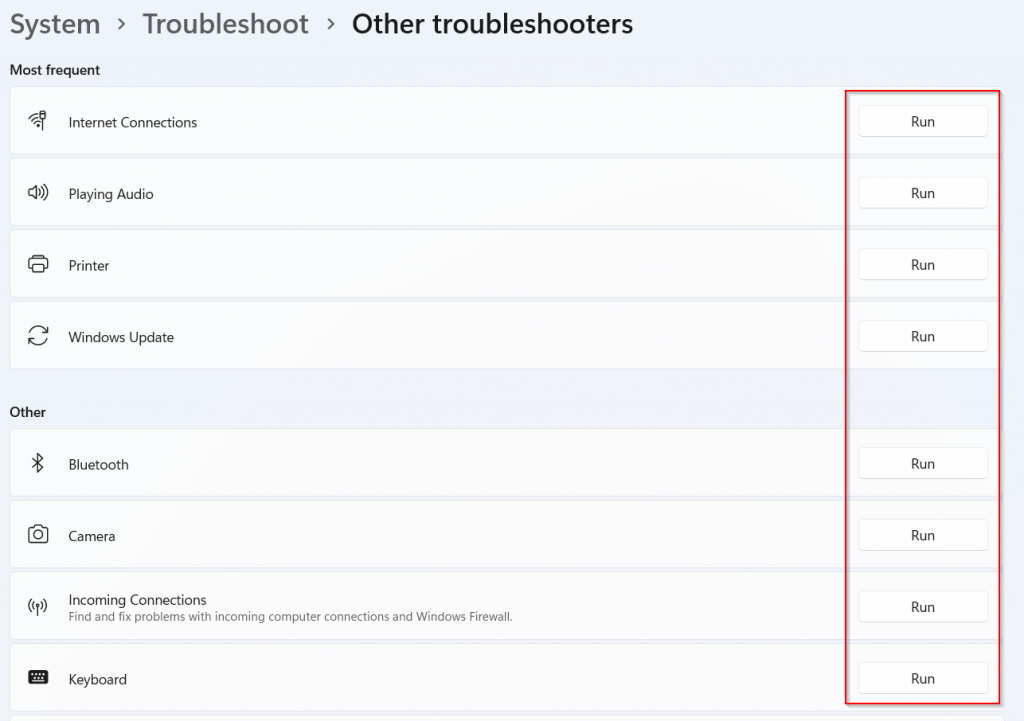
- Through the Settings App: This is probably the most straightforward method. Simply open the Settings app (you can search for it in the Start Menu or press Windows key + I), then navigate to System > Troubleshoot > Other troubleshooters. Here, you'll find a list of troubleshooters categorized by hardware and functionality.
- Through the Control Panel (Legacy): While Microsoft is gradually phasing out the Control Panel, it still offers access to troubleshooters. Open the Control Panel (search for it in the Start Menu), then select "Troubleshooting" under "System and Security." You'll find a link to "Run troubleshooters" which leads to the same list as the Settings app.
Running a Troubleshooter
Once you're in the "Other troubleshooters" screen, the process is quite intuitive.
- Identify the Problem Area: First, you'll need to identify the specific hardware or feature that's causing problems. Windows 11 neatly categorizes the troubleshooters, so look for the one that best matches your issue. For example, if your printer isn't working, you'd choose the "Printer" troubleshooter.
- Run the Troubleshooter: Once you've selected the appropriate troubleshooter, simply click the "Run" button next to it. The troubleshooter will then launch and begin diagnosing the problem.
- Follow the On-Screen Instructions: The troubleshooter will guide you through a series of steps, asking questions and performing tests. Be sure to read the instructions carefully and answer truthfully. The more information you provide, the better the troubleshooter can identify the root cause of the issue.
- Apply Recommended Fixes: After the troubleshooter has completed its diagnosis, it will present you with a list of recommended fixes. These fixes may include things like restarting a service, updating a driver, or changing a configuration setting. Carefully review the recommended fixes and select the ones you want to apply.
Troubleshooting Specific Hardware
Let's take a closer look at some common hardware issues and the corresponding troubleshooters you can use.
Printer Problems
A printer refusing to print is a classic tech frustration. The Windows 11 "Printer" troubleshooter can help resolve a variety of printing problems, including:
- Printer not responding
- Print jobs stuck in the queue
- Incorrect printer settings
- Driver issues
The troubleshooter will check things like printer connectivity, driver status, and spooler service settings. It might also suggest updating your printer driver or restarting the print spooler service. One trick is to also manually check if the printer is online and not paused. Sounds obvious, but it’s often overlooked!
Audio Issues
Can't hear anything? Or maybe your microphone isn't working? The "Playing Audio" and "Recording Audio" troubleshooters can help diagnose and fix sound-related problems.
- No sound output
- Microphone not working
- Distorted audio
- Incorrect audio device selected
These troubleshooters will check your audio device settings, driver status, and volume levels. They may also suggest updating your audio drivers or selecting a different audio device as the default. Also, make sure you haven’t accidentally muted your microphone or speakers! That’s another common culprit.
Bluetooth Woes
Bluetooth devices can be notoriously finicky. The "Bluetooth" troubleshooter can help resolve connection problems with Bluetooth devices like headphones, keyboards, and mice.
- Bluetooth device not connecting
- Bluetooth device not being detected
- Bluetooth driver issues
The troubleshooter will check your Bluetooth radio status, device pairing settings, and driver status. It might also suggest restarting the Bluetooth support service or updating your Bluetooth drivers. Pro tip: sometimes "forgetting" the device and re-pairing it can do the trick.
Network Adapter Issues
Experiencing internet connectivity problems? The "Network Adapter" troubleshooter can help diagnose and fix issues with your network connection.
- No internet connection
- Slow internet speed
- Network adapter not working
- IP address conflicts
The troubleshooter will check your network adapter settings, IP address configuration, and DNS settings. It might also suggest resetting your network adapter or releasing and renewing your IP address. A simple restart of your router can often solve the issue, too. Don’t underestimate the power of the reboot!
Hardware and Devices
The "Hardware and Devices" troubleshooter is a more general tool that can help identify and resolve problems with various hardware components connected to your computer.
- USB device not working
- External hard drive not being detected
- Driver issues with various hardware components
This troubleshooter checks for driver conflicts and other hardware-related issues. It can often help identify outdated or corrupted drivers. Keep in mind, this troubleshooter is more of a "catch-all" and might not be as specific as the other dedicated troubleshooters. However, it's still worth running if you're experiencing general hardware problems.
Advanced Troubleshooting Techniques
Sometimes, the standard troubleshooters aren't enough to solve the problem. If you're still experiencing issues after running the troubleshooters, here are some advanced techniques you can try.
Updating Drivers
Outdated or corrupted drivers are a common cause of hardware problems. Make sure you have the latest drivers installed for all your hardware components. You can update drivers through Device Manager.
- Open Device Manager (search for it in the Start Menu).
- Locate the device you want to update.
- Right-click on the device and select "Update driver."
- Choose "Search automatically for drivers" to let Windows find the latest drivers online. Alternatively, you can download the latest drivers from the manufacturer's website and install them manually.
Checking Device Manager
Device Manager is a valuable tool for identifying hardware problems. It displays a list of all the hardware components installed on your computer and indicates whether there are any problems with them. If a device has a yellow exclamation mark next to it, it means there's a problem with the device.
- Open Device Manager (search for it in the Start Menu).
- Look for any devices with a yellow exclamation mark.
- Right-click on the problematic device and select Properties.
- Check the "Device status" section for information about the problem.
System Restore
If you recently made changes to your system, such as installing new software or updating drivers, and you're now experiencing hardware problems, you can try using System Restore to revert your system to a previous state.
- Search for "Create a restore point" in the Start Menu and open it.
- Click on "System Restore."
- Follow the on-screen instructions to select a restore point and revert your system to that state.
Note: System Restore will not affect your personal files, but it will remove any software or drivers that were installed after the selected restore point.
Clean Boot
Sometimes, third-party software can interfere with hardware functionality. Performing a clean boot can help you identify if a software conflict is causing the problem.
- Press Windows key + R to open the Run dialog box.
- Type "msconfig" and press Enter.
- In the System Configuration window, go to the "Services" tab.
- Check the box that says "Hide all Microsoft services."
- Click "Disable all."
- Go to the "Startup" tab and click "Open Task Manager."
- In Task Manager, disable all startup items.
- Close Task Manager and click "OK" in the System Configuration window.
- Restart your computer.
After the restart, check if the hardware problem is resolved. If it is, then a third-party software was causing the issue. You can then re-enable the services and startup items one by one to identify the culprit.
When to Call for Help
While Windows 11 troubleshooters are powerful tools, they're not a magic bullet. Sometimes, the problem is too complex for the troubleshooters to handle, or the hardware itself is faulty. If you've tried all the troubleshooting steps and you're still experiencing problems, it's time to call for help. This could involve contacting the hardware manufacturer's support, seeking assistance from a qualified technician, or even considering replacing the faulty hardware.
Frequently Asked Questions
Let's address some common questions regarding Windows 11 troubleshooters.
-
Are the troubleshooters always effective?
No, troubleshooters are not always guaranteed to fix every problem. They are designed to address common issues and provide automated solutions, but complex or hardware-specific problems may require more advanced troubleshooting or professional assistance.
-
Do I need an internet connection to use the troubleshooters?
An internet connection is not always required to run the troubleshooters. However, some troubleshooters may need to download updated drivers or access online resources to diagnose and resolve certain issues. It's generally recommended to have an internet connection available when running troubleshooters for optimal results.
-
Can troubleshooters damage my computer?
No, troubleshooters are designed to be safe and non-destructive. They typically only make changes that are necessary to fix the identified problems. However, it's always a good idea to create a system restore point before running any troubleshooting tool, just in case something unexpected happens.
-
How often should I run the troubleshooters?
You only need to run the troubleshooters when you're experiencing a specific hardware problem. There's no need to run them regularly if your computer is working fine. However, if you encounter recurring issues, running the troubleshooters periodically might help identify and prevent future problems.
In this comprehensive guide, we've explored the world of Windows 11 troubleshooters, arming you with the knowledge and skills to tackle common hardware problems like a seasoned pro. We uncovered how to access these built-in problem-solvers, how to use them for specific hardware challenges such as printers, audio devices, Bluetooth connections, and network adapters, and even delved into advanced troubleshooting techniques when the standard methods fall short. Remember those times you felt helpless facing a stubborn tech issue? Those days are over!
Now it's your turn to put your newfound knowledge into practice. The next time you encounter a hardware hiccup in Windows 11, don't panic! Remember the steps we've discussed, and confidently launch the relevant troubleshooter. You might be surprised at how often these tools can quickly diagnose and resolve the problem, saving you time, money, and a whole lot of frustration.
So, go forth and troubleshoot! Your computer (and your sanity) will thank you. And who knows, maybe you'll even become the go-to tech guru among your friends and family. Ready to tackle your next tech challenge? What's the first hardware issue you're going to troubleshoot?
Post a Comment for "How to Use the Windows 11 Troubleshooters for Specific Hardware"
Post a Comment