How to Uninstall Updates in Windows 10
Windows Update Woes Be Gone: A Simple Guide to Uninstalling Updates
Hey there, fellow Windows warriors! Ever felt like your trusty computer suddenly started acting like a grumpy teenager after a Windows update? You're not alone! We've all been there, staring blankly at a screen that's either frozen, buggy, or just plain slower than molasses in January. Sometimes, those well-intentioned updates can cause more problems than they solve. But fear not! Today, we're diving deep into the mystical art of uninstalling Windows 10 updates, so you can reclaim your computer's sanity (and your own!). Think of it like this: your computer had a bad hair day, and we're here to fix it. Have you ever wondered why your printer stopped working right after an update, or why your favorite game suddenly started glitching? Or maybe you're just curious about what happens behind the scenes when Windows decides to "improve" itself? Stick around, because we're about to demystify the whole process and give you the power to take control of your system. Ready to become a Windows update uninstallation master? Let's get started!
Why Uninstall Updates Anyway?
Let's be honest, updates are supposed to make our lives easier, right? They're designed to patch security holes, improve performance, and add nifty new features. But sometimes, things go sideways faster than a greased piglet at a county fair. Here's why you might find yourself needing to uninstall an update:
- Buggy Behavior: This is the big one. Sometimes, updates introduce bugs that cause all sorts of problems. Apps might crash, your system might freeze, or you might encounter the dreaded Blue Screen of Death (BSOD). It's like your computer suddenly decided to develop a severe case of the hiccups.
- Driver Conflicts: Updates can sometimes mess with your drivers, the software that allows your computer to communicate with hardware like your printer, graphics card, or webcam. If your printer suddenly stops printing or your webcam refuses to show your beautiful face, a driver conflict might be to blame.
- Performance Issues: Ironically, updates meant to improve performance can sometimes do the opposite. You might notice your computer running slower, taking longer to boot up, or experiencing lag in games or other applications. It's like your computer suddenly gained a hundred pounds overnight.
- Compatibility Problems: Older software or hardware might not be compatible with the latest updates. This can lead to all sorts of weird and wonderful problems, from programs not launching to hardware devices not working correctly.
- Just Plain Annoyance: Sometimes, an update might introduce a feature you simply don't like. Maybe it's a change to the user interface, a new app you don't need, or just something that disrupts your workflow. It's like someone rearranged your desk without asking and now you can't find anything.
So, what's the solution? Uninstalling the problematic update! Think of it as hitting the "undo" button on a bad decision. It's a relatively straightforward process that can often resolve these issues and get your computer back on track.
Before You Uninstall: A Few Words of Caution
Before you go all Rambo on those updates, there are a few things you should keep in mind. Uninstalling updates should be a last resort, not the first thing you try. Here's why:
- Security Risks: Updates often include important security patches that protect your computer from malware and other threats. Uninstalling an update can leave you vulnerable. So, only uninstall if you're experiencing serious problems and consider it a temporary solution.
- Potential for More Problems: While uninstalling an update can fix some issues, it can also create new ones. It's a bit like performing surgery on yourself – you might fix the initial problem, but you could also accidentally poke something else.
- Backups are Your Best Friend: Before you uninstall anything, make sure you have a recent backup of your system. This way, if something goes wrong, you can easily restore your computer to a previous state. Think of it as having a safety net in case you fall.
Okay, now that we've covered the caveats, let's get down to the nitty-gritty of uninstalling those pesky updates.
Uninstalling Quality Updates: The "Normal" Updates
Quality updates are the regular, monthly updates that Microsoft releases to fix bugs and improve performance. These are the updates you're most likely to encounter problems with. Here's how to uninstall them:
- Open the Settings App: Click the Start button and then click the gear icon to open the Settings app. You can also press the Windows key + I to open it directly.
- Navigate to Update & Security: In the Settings app, click on "Update & Security." This is where all the Windows Update settings live.
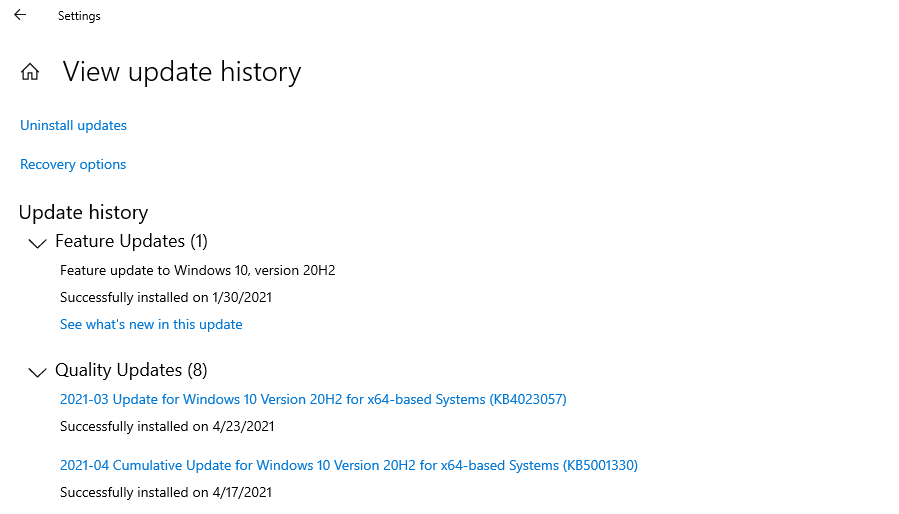
- View Update History: In the "Update & Security" window, click on "View update history." This will show you a list of all the updates that have been installed on your computer.
- Uninstall Updates: At the top of the "View update history" window, you'll see a link that says "Uninstall updates." Click on this link. This will open the "Uninstall an update" window in the Control Panel. (Yes, the Control Panel is still around!)
- Select the Update: In the "Uninstall an update" window, you'll see a list of all the installed updates. Find the update you want to uninstall. You can sort the list by date to make it easier to find the most recent updates.
- Uninstall: Once you've found the update, click on it to select it and then click the "Uninstall" button at the top of the window.
- Follow the Prompts: Windows will ask you to confirm that you want to uninstall the update. Click "Yes" to confirm. Windows will then uninstall the update. This may take a few minutes.
- Restart Your Computer: Once the update has been uninstalled, you'll be prompted to restart your computer. Restart your computer to complete the process.
After your computer restarts, check to see if the problem you were experiencing is resolved. If it is, great! You've successfully banished the bad update. If not, you might need to try uninstalling a different update or explore other troubleshooting options.
Uninstalling Feature Updates: The Big Ones
Feature updates are the major updates that Microsoft releases a few times a year. These updates introduce new features and significant changes to Windows. Uninstalling a feature update is a bit different than uninstalling a quality update. Here's how to do it:
- Open the Settings App: Just like before, click the Start button and then the gear icon to open the Settings app (or press Windows key + I).
- Navigate to Update & Security: Click on "Update & Security."
- Recovery Options: In the "Update & Security" window, click on "Recovery" in the left-hand menu.
- Go Back to the Previous Version of Windows 10: Under the "Go back to the previous version of Windows 10" section, you'll see a button that says "Get started." Click on this button. (Note: This option is only available for a limited time after you install a feature update, typically 10 days. After that, the old files are deleted to free up space.)
- Tell Microsoft Why: Windows will ask you why you're going back to the previous version. Select a reason from the list or enter your own reason. This helps Microsoft understand why people are uninstalling feature updates.
- Check for Updates: Windows will then suggest that you try checking for updates to see if there's a fix for the problem you're experiencing. If you've already tried that, click "No, thanks."
- Know What to Expect: Windows will then warn you that you'll need to know your password for your previous version of Windows and that any changes you made after installing the feature update will be lost. Click Next.
- One Last Warning: Windows will give you one last warning that you'll need your password. Click Next.
- Go Back: Finally, click the "Go back to earlier build" button. Windows will then uninstall the feature update and restore your previous version of Windows. This may take a while, so be patient.
Once your computer has been restored to the previous version of Windows, check to see if the problem you were experiencing is resolved. If it is, congratulations! You've successfully reverted to a more stable version of Windows. If not, you might need to explore other troubleshooting options.
Preventing Updates From Reinstalling: The Temporary Truce
So, you've uninstalled the problematic update. Great! But what's to stop Windows from automatically reinstalling it and putting you right back where you started? Here's how to temporarily prevent Windows from reinstalling updates:
- Download the "Show or Hide Updates" Troubleshooter: Microsoft provides a handy troubleshooter that allows you to hide specific updates. You can download it from the Microsoft website. Just search for "Show or hide updates troubleshooter" on your favorite search engine.
- Run the Troubleshooter: Once you've downloaded the troubleshooter, run it.
- Hide Updates: The troubleshooter will scan your system for available updates. Click "Next" to continue.
- Select the Update to Hide: The troubleshooter will then display a list of available updates. Select the update you want to hide and click Next.
- Complete the Process: The troubleshooter will then hide the selected update. Click "Close" to complete the process.
This will prevent Windows from automatically reinstalling the update. However, it's only a temporary solution. Eventually, you'll need to install a newer version of the update that fixes the problem you were experiencing.
Seeking Professional Help: When to Call in the Experts
Sometimes, despite your best efforts, you might not be able to fix the problem on your own. If you're feeling overwhelmed or unsure about what to do, it's always a good idea to seek professional help. Here are some situations where you might want to call in the experts:
- You're Not Comfortable with the Steps: If you're not comfortable with the steps involved in uninstalling updates or troubleshooting Windows problems, it's best to leave it to the professionals. You don't want to accidentally make things worse.
- You've Tried Everything and Nothing Works: If you've tried all the troubleshooting steps you can find and you're still experiencing problems, it might be time to call in the experts. They have the knowledge and experience to diagnose and fix complex problems.
- You Suspect a Hardware Problem: Sometimes, Windows problems are caused by hardware issues. If you suspect that your hardware might be failing, it's best to take your computer to a qualified technician for diagnosis and repair.
There are plenty of qualified computer technicians who can help you with Windows update problems. You can find them online, through local computer repair shops, or through referrals from friends and family.
Questions and Answers: Your Update Uninstalling FAQs
- Question: How long do I have to go back to a previous version of Windows after a feature update?
Answer: Typically, you have 10 days to revert to the previous version of Windows after installing a feature update. After that, the old files are deleted to free up space. - Question: Will uninstalling an update delete my files?
Answer: Uninstalling a quality update should not delete your files. However, uninstalling a feature update will remove any changes you made after installing the update, so it's important to back up your files before uninstalling a feature update. - Question: What if the "Uninstall" button is grayed out for an update?
Answer: If the "Uninstall" button is grayed out, it means that the update cannot be uninstalled. This might be because it's a critical update or because it's been too long since the update was installed. - Question: Can I permanently disable Windows Updates?
Answer: While it's not recommended, you can disable Windows Updates. However, this will leave your computer vulnerable to security threats. It's better to manage updates and install them when they're available.
So, there you have it! A comprehensive guide to uninstalling updates in Windows 10. We've covered everything from why you might need to uninstall updates to how to prevent them from reinstalling. Remember, uninstalling updates should be a last resort, but it can be a lifesaver when things go wrong. Now you know how to take control of updates on your PC!
And with that, friends, we arrive at the conclusion of our exploration into the world of Windows Update management. We've navigated the often-turbulent waters of buggy updates, driver conflicts, and performance hiccups, armed with the knowledge to uninstall those pesky culprits and restore our systems to their former glory. But knowledge is only power when it's put into action! Now that you're equipped with these skills, I encourage you to take control of your Windows experience. The next time an update throws a wrench into your workflow, don't despair – remember the steps we've covered. And remember, backing up your system is always a good idea! Did you find this guide helpful? Share it with your friends and family so that they, too, can conquer their Windows update woes! And if you've got any burning questions or tips of your own, feel free to drop them in the comments below. Now, go forth and update (or uninstall!) with confidence!
Post a Comment for "How to Uninstall Updates in Windows 10"
Post a Comment