How to Partition Your Hard Drive in Windows 10
Partition Your Hard Drive in Windows 10: A Simple Guide.
Hey there, tech enthusiasts! Ever feel like your computer is one giant, messy room? Everything's just piled together, and finding thatonefile you need is like searching for a needle in a haystack? Yeah, we’ve all been there. That’s where hard drive partitioning comes in. Think of it as organizing your digital space – creating separate compartments for your operating system, applications, and personal files. It's like giving each aspect of your digital life its own room in your house, nice and organized.
Now, before you start picturing yourself as a digital Marie Kondo, let's clear up a few things. You might be thinking, "Why bother? My computer seems to be working just fine." And that's perfectly valid. But stick with me for a moment. Imagine your Windows installation gets corrupted (and let’s be honest, it happens). If everything’s on one partition, you’re looking at a complete system wipe, meaningeverythinggoes. But with partitions, you can isolate your operating system, making it easier to reinstall without touching your precious photos, videos, and documents. Disaster averted!
Or perhaps you're a dual-booting enthusiast, wanting to run both Windows and Linux on the same machine. Partitioning is essential for that. It’s like having two separate houses on the same lot – each operating system gets its own space to thrive. And let's not forget about organization. A dedicated partition for your applications can keep your system running smoothly, preventing conflicts and ensuring that your programs have the resources they need.
Think of it as this: imagine you have one giant drawer for all your clothes. Shirts, pants, socks, everything's jumbled together. Finding anything is a nightmare. Now, imagine you add dividers, creating separate sections for each type of clothing. Suddenly, everything is organized, and finding what you need is a breeze. That’s what partitioning does for your hard drive.
But here’s the kicker: partitioning isn't just for tech gurus or system administrators. It’s something anyone can do with a little guidance. And that's exactly what this guide is here for. We’ll walk you through the process step-by-step, making it as painless as possible. We'll cover everything from understanding the different types of partitions to using Windows' built-in tools to get the job done.
So, are you ready to take control of your digital real estate? Are you ready to transform your cluttered hard drive into a well-organized, efficient machine? Great! Because in the next few sections, we're going to dive deep into the world of hard drive partitioning in Windows 10, and trust me, you'll be amazed at what you can achieve. Let’s get started!
Why Partition Your Hard Drive?
Okay, friends, let’s delve deeper into the why.We touched on it earlier, but understanding the benefits of partitioning can really motivate you to take the plunge. It's not just about being organized (although that's a great perk!), it's about enhancing performance, improving security, and simplifying system maintenance.
Enhanced Data Security
This is a big one. Picture this: your computer gets hit with a nasty virus. If everything is on one partition, the virus can potentially infecteverything. But, if you have separate partitions, you can isolate the damage. Your operating system partition might be toast, but your personal files on another partition could be safe and sound.
It's like having a firewall within your own system. A partition dedicated to data storage creates a barrier, minimizing the risk of widespread data loss in case of malware attacks or system failures. Think of it as creating a safe room for your most valuable digital possessions. You wouldn't leave your valuables lying around in plain sight, would you? Treat your data the same way.
Improved System Performance
Over time, your operating system drive can become fragmented and cluttered, leading to performance slowdowns. Having a separate partition for your operating system allows you to easily reinstall it without affecting your other files. This is like giving your computer a fresh start, optimizing performance, and getting rid of unnecessary bloat.
Furthermore, isolating your applications on a separate partition can prevent them from interfering with your operating system. This can lead to smoother multitasking and faster application load times. It's like having a dedicated workspace for each of your programs, ensuring that they have the resources they need to run efficiently.
Simplified System Maintenance and Recovery
Imagine needing to reinstall Windows. With a single partition setup, you're looking at backing upeverything, reinstalling the OS, and then restoring your files. It's a time-consuming and potentially stressful process. But with partitions, you can simply reinstall the OS on its dedicated partition without touching your other files.
This also simplifies system backups. You can choose to back up only the partitions that contain your important data, saving time and storage space. It's like having a modular backup system, allowing you to focus on what matters most.
Dual-Booting Made Easy
Want to try out Linux or another operating system without completely replacing Windows? Partitioning is the answer. You can create a separate partition for each operating system, allowing you to choose which one to boot into at startup. It's like having two computers in one!
This is particularly useful for developers, testers, or anyone who wants to experiment with different operating systems without risking their primary system. It's a safe and convenient way to explore new technologies and expand your computing horizons.
Better Organization
Finally, let’s not forget about the simple benefit of better organization. A well-partitioned hard drive makes it easier to manage your files, find what you need, and keep your system running smoothly. It's like having a well-organized filing cabinet instead of a giant pile of papers on your desk.
So, whether you're concerned about security, performance, or simply want a more organized system, partitioning your hard drive is a worthwhile endeavor. It's an investment in the long-term health and efficiency of your computer.
Understanding Partition Types and File Systems
Before we get our hands dirty, it's crucial to understand the basic concepts behind partitioning. Think of it as learning the rules of the road before you start driving. We need to know about partition types and file systems. Don't worry; we'll keep it simple and jargon-free.
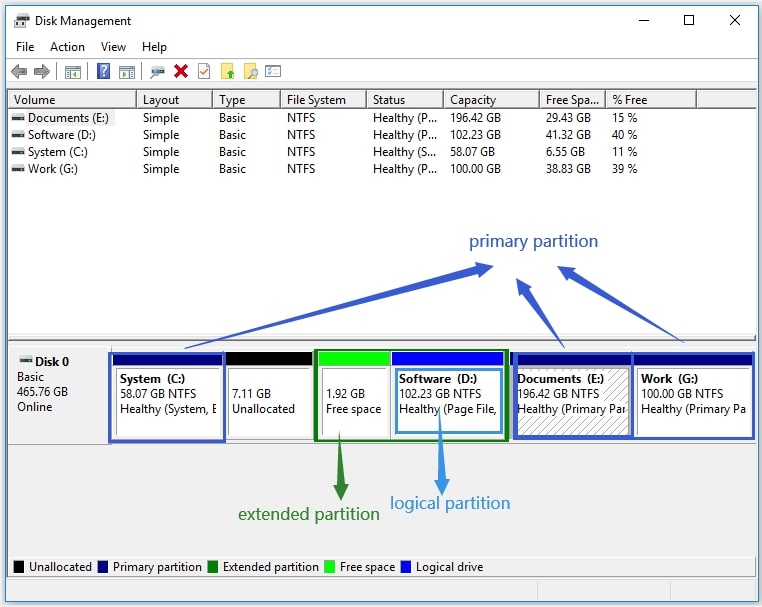
Primary vs. Extended Partitions
Hard drives are typically divided intoprimaryandextendedpartitions. A primary partition can be used to install an operating system, while an extended partition acts as a container forlogical drives.
Primary Partitions*: These are the main partitions, and traditionally, you can have up to four primary partitions on a single hard drive using the older MBR (Master Boot Record) partitioning scheme. One of these primary partitions can be designated as the active partition, which is the one the computer boots from.
Extended Partitions*: If you need more than four partitions, you can create one extended partition. Within this extended partition, you can then create multiplelogical drives. Think of the extended partition as a filing cabinet, and the logical drives as the drawers within that cabinet.
In modern systems, the GPT (GUID Partition Table) partitioning scheme is becoming more common. GPT allows for a much larger number of partitions (theoretically, practically hundreds), and it doesn't have the same limitations as MBR. Windows 10 supports both MBR and GPT.
File Systems: NTFS vs. FAT32
Afile systemis the way an operating system organizes and stores files on a storage device. The two most common file systems in Windows are NTFS and FAT32.
NTFS (New Technology File System)*: This is the modern file system used by Windows. It supports larger file sizes, better security features (like file permissions), and improved reliability compared to FAT32. NTFS is the recommended file system for your Windows partition.
FAT32 (File Allocation Table 32)*: This is an older file system that is compatible with a wide range of operating systems and devices. However, it has limitations, such as a maximum file size of 4GB. FAT32 is less secure and less efficient than NTFS. You might use FAT32 for USB drives or older systems, but it's generally not recommended for your main hard drive.
When you're creating a new partition, you'll need to choose a file system. In most cases, you'll want to choose NTFS for your Windows partitions.
Understanding Disk Management
Windows has a built-in tool called Disk Managementthat allows you to create, resize, and delete partitions. It's a powerful tool, but it's important to use it carefully. Making mistakes in Disk Management can lead to data loss.
We'll be using Disk Management in the next section to actually partition your hard drive. But before we do that, it's important to understand the basics. Take your time, read the descriptions carefully, and don't be afraid to ask questions if you're unsure about something.
Step-by-Step Guide to Partitioning in Windows 10
Alright, let’s get our hands dirty! We're going to walk through the process of partitioning your hard drive using Windows 10's built-in Disk Management tool. Remember to back up your important data before making any changes to your partitions. While the process is generally safe, it's always better to be safe than sorry.
Accessing Disk Management
- Right-clickon the Start button (the Windows logo in the bottom-left corner of your screen).
- Select "Disk Management" from the menu that appears. This will open the Disk Management window.
Alternatively, you can search for "Disk Management" in the Windows search bar and click on the result to open it.
Identifying Your Hard Drive
In the Disk Management window, you'll see a list of all the storage devices connected to your computer. Make sure you identify the correct hard drive that you want to partition. It's usually listed as "Disk 0," "Disk 1," and so on. Beabsolutely certainyou've selected the right disk, as making changes to the wrong disk can lead to data loss on a different drive.
Pay attention to the size and labels of the drives to ensure you're working with the correct one.
Shrinking an Existing Partition
To create a new partition, you'll typically need to shrink an existing one to create free space.
- Right-clickon the partition you want to shrink (usually your C: drive, which contains your Windows installation).
- Select "Shrink Volume" from the menu.
- Windows will query the volume for available shrink space. This may take a few moments.
- In the "Enter the amount of space to shrink in MB" box, enter the amount of space you want to shrink from the partition. This will be the size of your new partition. Be mindful of the size you allocate. Consider the intended use of the new partition.
- Click Shrink.Windows will then shrink the partition, creating unallocated space on your hard drive.
Creating a New Partition
Now that you have unallocated space, you can create a new partition.
- Right-clickon the unallocated space.
- Select "New Simple Volume" from the menu. This will start the New Simple Volume Wizard.
- Click "Next" on the first screen of the wizard.
- In the "Specify Volume Size" screen, enter the size of the new partition in MB. You can use the entire unallocated space or create a smaller partition.
- Click Next.
- In the "Assign Drive Letter or Path" screen, choose a drive letter for the new partition (e.g., D:, E:, F:).
- Click Next.
- In the "Format Partition" screen, choose the file system (NTFS is recommended), enter a volume label (a name for the partition), and choose whether to perform a quick format. A quick format is faster, but it doesn't check the disk for errors.
- Click Next.
- Click Finish.Windows will then create and format the new partition. It will appear as a new drive in File Explorer.
Important Considerations
Backup Your Data*: Always back up your important data before making any changes to your partitions. Choose the Right Size*: Consider the intended use of the new partition when choosing its size. Use NTFS*: Use NTFS as the file system for your Windows partitions. Be Careful*: Disk Management is a powerful tool, so use it carefully.
By following these steps, you can successfully partition your hard drive in Windows 10 and enjoy the benefits of a more organized and efficient system.
Post-Partitioning Tasks and Tips
Congratulations! You've successfully partitioned your hard drive. But the journey doesn't end there. Now it's time to configure your new partitions and put them to good use. Here are some post-partitioning tasks and tips to help you get the most out of your newly organized system.
Moving Files and Folders
The first thing you'll probably want to do is move some of your files and folders to your new partition. This could include your documents, photos, videos, music, or even entire application installations.
To move files and folders, simply drag and drop them from their current location to the new partition in File Explorer. You can alsocutandpastethem. Be patient, as large transfers may take some time.
For applications, it's generally best to uninstall them from their original location and then reinstall them on the new partition. This ensures that all the necessary files and registry entries are properly configured.
Configuring Application Installations
When installing new applications, be sure to choose the new partition as the installation location. Most installers will allow you to specify the installation directory. This will help keep your primary Windows partition clean and organized.
Some applications may not allow you to choose the installation location. In these cases, you can try creating a symbolic link to move the application's data files to the new partition. This is a more advanced technique, but it can be useful for freeing up space on your primary partition.
Optimizing Performance
After partitioning your hard drive, you may want to optimize performance by defragmenting your partitions. Defragmentation rearranges the files on a partition to improve read and write speeds.
Windows has a built-in defragmentation tool called "Optimize Drives." You can access it by searching for "defragment" in the Windows search bar. Select each of your partitions in the Optimize Drives window and click "Optimize" to defragment them.
Note that defragmentation is generally not necessary for SSDs (Solid State Drives). In fact, defragmenting an SSD can actually shorten its lifespan.
Monitoring Disk Space
It's important to monitor the disk space on your partitions to ensure that you don't run out of space. Windows will usually warn you when a partition is getting full.
You can check the disk space on your partitions in File Explorer. Simply right-click on a partition and select Properties.The Properties window will show you the used and free space on the partition.
If a partition is getting full, you can try deleting unnecessary files, moving files to another partition, or shrinking another partition to create more space.
Maintaining Your Partitions
Regular maintenance is essential for keeping your partitions running smoothly. This includes running disk cleanup, checking for errors, and defragmenting your partitions (if you're using a traditional hard drive).
You can use Windows' built-in tools to perform these tasks. The Disk Cleanup tool can help you remove temporary files and other unnecessary data. The Error Checking tool can scan your partitions for errors and attempt to fix them.
By following these tips, you can ensure that your partitioned hard drive provides you with years of reliable and efficient service.
Troubleshooting Common Partitioning Issues
Even with the best planning, things can sometimes go wrong during the partitioning process. Let's address some common issues you might encounter and how to troubleshoot them. Don’t panic – most problems are fixable!
"Not Enough Space" Error
This is a common issue that occurs when you try to shrink a partition. It usually means that there isn't enough contiguous free space on the partition to shrink it by the amount you specified.
Solution:
- Defragment the Partition*: Defragmenting the partition can consolidate the free space and allow you to shrink it further. Use the "Optimize Drives" tool in Windows to defragment the partition.
- Move Unmovable Files*: Some files, such as the page file or hibernation file, cannot be moved by the defragmentation tool. You may need to temporarily disable these files to shrink the partition. Search online for specific instructions on how to disable the page file and hibernation file.
- Reduce the Shrink Amount*: Try shrinking the partition by a smaller amount. If you can't shrink it as much as you initially wanted, you can always shrink it further later.
"Dynamic Disk" Issue
Sometimes, when you try to partition a hard drive, you might encounter a "Dynamic Disk" error. Dynamic disks are a different type of disk configuration that can be more complex to manage than basic disks.
Solution:
- Convert to Basic Disk*: The easiest solution is to convert the dynamic disk back to a basic disk. However, this will erase all data on the disk, so be sure to back up your data first. You can convert the disk to basic using Disk Management.
- Use Third-Party Partitioning Tools*: Some third-party partitioning tools can manage dynamic disks without data loss. However, use these tools with caution and make sure they are reputable.
Boot Problems After Partitioning
In rare cases, partitioning your hard drive can cause boot problems. This can happen if you accidentally delete or modify the boot partition.
Solution:
- Use Windows Recovery Environment*: Boot from a Windows installation disc or USB drive and enter the Windows Recovery Environment.
- Run Startup Repair*: Use the Startup Repair tool in the Windows Recovery Environment to automatically fix boot problems.
- Rebuild BCD*: If Startup Repair doesn't work, you may need to manually rebuild the Boot Configuration Data (BCD). Use the command prompt in the Windows Recovery Environment to run the following commands: `bootrec /fixmbr`
`bootrec /fixboot`
`bootrec /scanos`
`bootrec /rebuildbcd`
Data Loss
Data loss is the biggest fear when partitioning a hard drive. While the partitioning process is generally safe, mistakes can happen.
Solution:
- Stop Using the Drive*: If you accidentally delete a partition or format the wrong drive, stop using the drive immediately. Writing new data to the drive can overwrite the deleted files and make them unrecoverable.
- Use Data Recovery Software*: Use data recovery software to scan the drive for deleted files. There are many reputable data recovery tools available, both free and paid.
- Consult a Professional*: If you're unable to recover the data yourself, consult a professional data recovery service. They have specialized tools and techniques that can recover data from damaged or formatted drives.
By understanding these common issues and their solutions, you can be prepared to troubleshoot any problems that may arise during the partitioning process. Remember to always back up your data before making any changes to your partitions.
Partitioning and SSDs: What You Need to Know
Solid State Drives (SSDs) have revolutionized the way we experience computing. Their speed and efficiency are undeniable. However, when it comes to partitioning SSDs, there are a few key differences to consider compared to traditional Hard Disk Drives (HDDs). Let's dive into what you need to know.
Is Partitioning an SSD Necessary?
This is the first question many people ask. Unlike HDDs, SSDs don't rely on physical movement to access data. This means that the performance benefits of partitioning, such as reducing fragmentation and improving access times, are less significant on SSDs.
For Organization: Partitioning can still be useful for organization, such as separating your operating system from your data files. For Dual-Booting: If you want to dual-boot multiple operating systems, partitioning is still necessary. For Imaging: Smaller partitions lead to smaller images and faster restore times.
TRIM Support
TRIM is a command that allows the operating system to inform the SSD which data blocks are no longer in use and can be erased. This helps maintain the SSD's performance over time.
Ensure TRIM is Enabled: Make sure that TRIM is enabled on your system. You can check this by opening a command prompt as an administrator and running the command `fsutil behavior query Disable Delete Notify`. If the result is `Disable Delete Notify = 0`, TRIM is enabled. If it's `Disable Delete Notify = 1`, TRIM is disabled. You can enable it by running the command `fsutil behavior set Disable Delete Notify 0`. Partition Alignment: Proper partition alignment is crucial for SSD performance. Windows 10 automatically aligns partitions correctly, so you usually don't need to worry about this. However, if you're using an older operating system or a third-party partitioning tool, make sure that the partitions are aligned to 4K boundaries.
Over-Provisioning
Over-provisioning is the practice of leaving a certain percentage of the SSD's capacity unpartitioned. This allows the SSD's controller to have more space to work with for wear leveling and garbage collection, which can improve performance and extend the lifespan of the SSD.
Manufacturer Over-Provisioning: Most SSDs come with a certain amount of over-provisioning built-in. User-Defined Over-Provisioning: You can also create your own over-provisioning by leaving some unallocated space at the end of the SSD. A common recommendation is to leave 7-10% of the capacity unpartitioned.
Avoiding Excessive Writes
SSDs have a limited number of write cycles. While modern SSDs are very durable, it's still a good idea to avoid unnecessary writes to prolong their lifespan.
Move Temporary Files: Move temporary files and browser caches to a separate partition (if you're partitioning) or to a traditional HDD if you have one. Disable Indexing: Consider disabling indexing on the SSD if you don't need it. Indexing can cause a lot of small writes to the drive. Monitor SSD Health: Use a tool like Crystal Disk Info to monitor the health of your SSD. This can help you identify potential problems early on.
By keeping these considerations in mind, you can effectively partition your SSD and optimize its performance and lifespan.
Partitioning your hard drive in Windows 10 might seem like a daunting task at first, but hopefully, this guide has shown you that it's a manageable process with significant benefits. We've explored the reasons for partitioning, the different types of partitions and file systems, the step-by-step process of using Disk Management, post-partitioning tasks, troubleshooting common issues, and special considerations for SSDs.
Now, it's time to take action. Evaluate your storage needs and decide if partitioning is right for you. If it is, back up your data, follow the steps outlined in this guide, and start enjoying the benefits of a more organized, efficient, and secure system. Don't be afraid to experiment and customize your partitions to suit your specific needs.
Remember, a well-organized hard drive can make a world of difference in your computing experience. It can improve performance, enhance security, and simplify system maintenance. So, go ahead, take control of your digital real estate and transform your cluttered hard drive into a well-oiled machine.
And finally, take a moment to share this article with your friends and family who might also benefit from learning about hard drive partitioning. After all, sharing is caring! Now that you're armed with the knowledge and skills to partition your hard drive, what exciting new projects will you tackle with your newly organized system?
Post a Comment for "How to Partition Your Hard Drive in Windows 10"
Post a Comment