How to Defragment Your Hard Drive in Windows 11
Optimize Your PC: A Simple Guide to Defragmenting in Windows 11
Hey there, tech enthusiasts!
Ever feel like your computer is moving at the speed of a snail in molasses? Or maybe it’s more like trying to herd cats – tasks take forever to load, programs freeze unexpectedly, and you’re left staring blankly at the screen, wondering where it all went wrong? Well, before you chuck your precious PC out the window in a fit of digital rage, let's talk about something that might just breathe some new life into it: defragmentation!
Now, I know what you might be thinking. Defragmentation? Sounds like something straight out of the early 2000s, like dial-up internet and Tamagotchis. And you wouldn’t be entirely wrong. Defragmenting your hard drive used to be a regular chore, right up there with emptying the recycle bin and running a virus scan. But things have changed, haven't they? We've got solid state drives (SSDs) now, fancy cloud storage, and enough processing power to launch a rocket to Mars.
So, why are we even talking about defragmentation? Because, my friends, not everyone has made the leap to the glorious world of SSDs! Plenty of you are still rocking traditional mechanical hard drives (HDDs), and if you are, defragmentation is still a relevant, albeit less frequent, maintenance task. Think of it like this: your hard drive is like a library, and when you add and remove files, it’s like books being scattered all over the place. When your computer needs to access a file, it has to hunt all over the library to find all the pieces, slowing everything down. Defragmentation is like re-shelving all those books, making it much faster and easier for your computer to find what it needs.
But here's the thing: defragmenting an SSD is actually bad for it! SSDs work in a completely different way than HDDs, and the process of defragmentation can actually shorten their lifespan. So, before we dive in, it’s crucial to know what kind of drive you have. If you’re not sure, don’t worry, we’ll cover that too!
In this guide, we're going to walk through the process of defragmenting your hard drive in Windows 11, step by step. We'll cover everything from checking your drive type to scheduling regular defrags, all in plain English (no tech jargon allowed!). We’ll even throw in a few tips and tricks to keep your PC running smoothly. Think of this as a friendly helping hand in navigating the often-confusing world of computer maintenance.
So, whether you're a seasoned tech guru or a complete newbie, stick around. By the end of this article, you'll know exactly how to defragment your hard drive in Windows 11, and more importantly, you'll understand why it matters. Are you ready to unlock the hidden potential of your PC and say goodbye to those frustrating slowdowns? Let's get started and discover how to keep your digital world running like a well-oiled machine!
Defragmenting Your Hard Drive in Windows 11: A Step-by-Step Guide
Okay, friends, let's get down to business! This is where we roll up our sleeves and get our hands digitally dirty (don't worry, it's not as messy as it sounds!). Here's a comprehensive, step-by-step guide to defragmenting your hard drive in Windows 11.
1. Check Your Drive Type: HDD or SSD?
Before you do anything else, you need to figure out what kind of drive you have. Remember, defragmenting an SSD is a big no-no!
Open File Explorer: Click on the File Explorer icon on your taskbar (it looks like a little folder). Alternatively, you can press the Windows key + E on your keyboard. Navigate to "This PC": In the left-hand pane, click on "This PC." This will show you all the drives connected to your computer. Right-click on your drive: Right-click on the drive you want to check (usually labeled as "Local Disk (C:)"). Select "Properties": In the context menu that appears, click on Properties.Go to the "Tools" tab: In the Properties window, click on the "Tools" tab. Click "Optimize": Under the "Optimize and defragment drive" section, click the "Optimize" button. Identify the Drive Type: In the "Optimize Drives" window, you'll see a list of your drives. The "Media type" column will tell you whether each drive is a "Solid state drive" (SSD) or a "Hard disk drive" (HDD).
If your drive is listed as a "Solid state drive," STOP right there! You don't need to defragment it. In fact, doing so could harm your drive. If your drive is listed as a "Hard disk drive," then proceed to the next step.
2. Open the Defragmentation Tool
Now that you've confirmed you have an HDD, let's open the built-in defragmentation tool in Windows 11. Search for "Defragment": Click on the Windows search bar (located on the taskbar) and type defragment.Select "Defragment and Optimize Drives": In the search results, click on "Defragment and Optimize Drives." This will open the "Optimize Drives" window, which we saw in the previous step.
3. Analyze Your Drive
Before you defragment, it's a good idea to analyze your drive. This will tell you how fragmented it is and whether it needs defragmenting.
Select the Drive: In the "Optimize Drives" window, select the drive you want to analyze (usually "Local Disk (C:)"). Click "Analyze": Click the "Analyze" button. Windows will scan your drive and tell you the percentage of fragmentation.
A fragmentation percentage of 10% or higher is generally considered a good reason to defragment your drive. However, even a lower percentage can benefit from defragmentation, especially if you're experiencing performance issues.
4. Defragment Your Drive
Now for the main event!
Select the Drive: In the "Optimize Drives" window, make sure the drive you want to defragment is selected. Click "Optimize": Click the "Optimize" button. Windows will now start defragmenting your drive.
The defragmentation process can take anywhere from a few minutes to a few hours, depending on the size of your drive and the level of fragmentation. You can continue using your computer while defragmentation is in progress, but it might be a bit slower than usual. It’s generally best to let it run uninterrupted if you can.
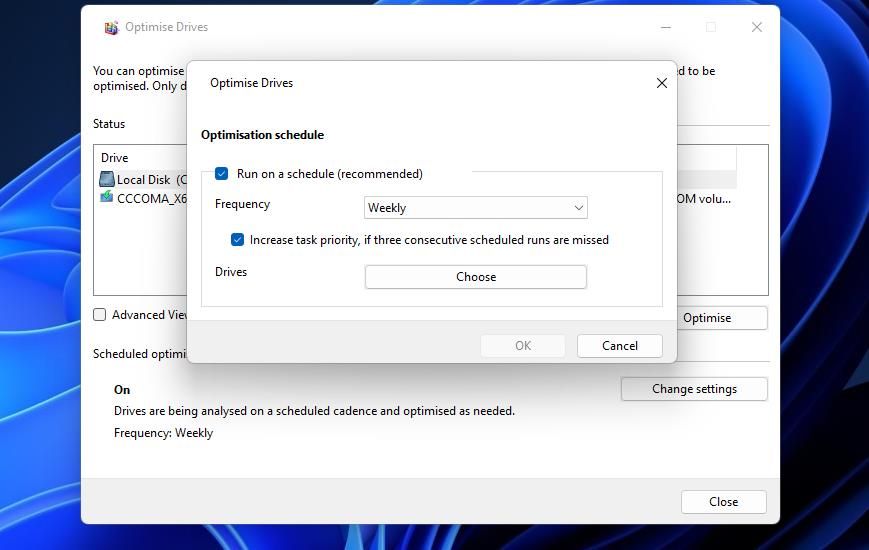
5. Schedule Regular Defragmentation (Optional)
To keep your drive running smoothly, you can schedule regular defragmentation. Windows 11 will automatically defragment your drive in the background, so you don't have to remember to do it manually.
Click "Change settings": In the "Optimize Drives" window, click the "Change settings" button. Enable Scheduled Optimization: Make sure the "Run on a schedule (recommended)" checkbox is checked. Choose the Frequency: Use the "Frequency" dropdown menu to select how often you want to defragment your drive. You can choose from "Daily," "Weekly," or Monthly.Weekly is a good option for most users. If you use your computer heavily, you might consider daily defragmentation. If you only use your computer occasionally, monthly defragmentation might be sufficient. Choose the Drives: Click the "Choose" button under Drives.Select the Drives: Check the boxes next to the drives you want to include in the scheduled defragmentation. Click "OK": Click "OK" to save your changes.
Windows will now automatically defragment your drive according to the schedule you set. You can still manually defragment your drive at any time, even if scheduled defragmentation is enabled.
6. Tips for Faster Defragmentation
Here are a few tips to speed up the defragmentation process:
- Close Unnecessary Programs: Close any programs you're not using while defragmenting. This will free up system resources and allow defragmentation to run faster.
- Disable Screen Saver: Temporarily disable your screen saver. Screen savers can sometimes interfere with defragmentation.
- Run Disk Cleanup: Before defragmenting, run Disk Cleanup to remove unnecessary files from your drive. This will reduce the amount of data that needs to be defragmented. You can find Disk Cleanup by searching for it in the Windows search bar.
- Avoid Heavy Usage: While defragmentation is running, avoid using your computer for resource-intensive tasks like gaming or video editing.
7. What if Defragmentation Fails?
Sometimes, defragmentation might fail to complete. This can be due to several reasons, such as:
- Insufficient Disk Space: Make sure you have enough free space on your drive. You should have at least 15% of your drive's capacity free for defragmentation to work properly.
- Corrupted Files: Corrupted files can sometimes prevent defragmentation from completing. Try running a disk check to identify and repair any corrupted files. You can do this by right-clicking on your drive in File Explorer, selecting "Properties," going to the "Tools" tab, and clicking the "Check" button.
- Third-Party Programs: Some third-party programs, such as antivirus software, can interfere with defragmentation. Try temporarily disabling these programs and running defragmentation again.
If you're still having problems, you might want to consider using a third-party defragmentation tool. There are many free and paid defragmentation tools available that offer more advanced features and options.
Frequently Asked Questions
Let's tackle some common questions you might have about defragmentation.
1. How often should I defragment my hard drive?
For most users, defragmenting your hard drive once a month is sufficient. However, if you use your computer heavily and frequently add and remove files, you might want to defragment it more often, such as once a week.
2. Can I use my computer while defragmentation is running?
Yes, you can use your computer while defragmentation is in progress. However, it might be a bit slower than usual. It's generally best to let it run uninterrupted if you can.
3. Is defragmentation the same as Disk Cleanup?
No, defragmentation and Disk Cleanup are two different things. Disk Cleanup removes unnecessary files from your drive, while defragmentation reorganizes the files on your drive to improve performance. It's a good idea to run both Disk Cleanup and defragmentation regularly to keep your computer running smoothly.
4. Will defragmentation delete my files?
No, defragmentation will not delete your files. It simply reorganizes them on your drive. However, it's always a good idea to back up your important files before performing any major maintenance task, just in case something goes wrong.
Wrapping Up: Give Your PC a Performance Boost!
Alright, we've reached the end of our defragmentation journey! We've covered everything from checking your drive type to scheduling regular defrags. By now, you should have a solid understanding of how to defragment your hard drive in Windows 11 and why it's important (if you have an HDD, that is!). Remember, defragmentation is like giving your PC a much-needed spa day – it can help to improve performance, reduce loading times, and keep your digital life running smoothly.
But don't just take my word for it! Put this knowledge into action. Go ahead and check your drive type. If you have an HDD, run an analysis and see how fragmented it is. Then, if necessary, defragment it. You might be surprised at the difference it makes!
Now, here's your call to action: Take five minutes right now to check your drive type. If you're rocking an HDD, schedule a defrag for later this week. You'll thank yourself later when your PC is running like a champ!
And remember, taking care of your computer is like taking care of your car or your house. A little bit of maintenance goes a long way. So, keep those drives defragmented, your software updated, and your virus scans running, and you'll be enjoying a smooth and reliable computing experience for years to come.
So, what are you waiting for? Go give your PC some love! Are you ready to unleash the full potential of your Windows 11 machine?
Post a Comment for "How to Defragment Your Hard Drive in Windows 11"
Post a Comment