How to Use the Windows 10 Disk Management Tool
Windows 10 Disk Management: Your Guide to Mastering Hard Drives.
Hey there, tech enthusiasts! Ever felt like your computer's hard drive is a mysterious black box? Like you're only using a fraction of its potential? Or maybe you've encountered the dreaded "low disk space" warning and felt utterly helpless? We've all been there. Imagine buying a brand-new computer only to find it bogged down with pre-installed software, partitioning it in ways that make no sense, and leaving you scratching your head about how to reclaim that wasted space.
Or picture this: You're trying to install that awesome new game, but your computer throws a fit because your C: drive is bursting at the seams. You know you have plenty of storage on your D: drive, but moving things around feels like defusing a bomb. One wrong move, andpoof, your precious data could vanish. It can feel like you need a degree in computer science just to manage your own storage!
This is where the Windows 10 Disk Management tool swoops in to save the day. It's like having a secret weapon against storage woes. It's a built-in utility that lets you manage your hard drives, create partitions, format volumes, and perform a whole host of other storage-related tasks. Think of it as the ultimate control panel for your computer's storage, giving you the power to organize and optimize your drives like a pro.
Now, you might be thinking, "Disk Management? Sounds complicated!" And I get it. The name itself can be a bit intimidating. But trust me, it's not as scary as it sounds. In fact, with a little guidance, you'll be navigating Disk Management like a seasoned IT guru in no time. We’ll break down the jargon, walk through the steps, and show you how to use Disk Management to unleash the full potential of your hard drives. We’re not going to throw a bunch of confusing technical terms at you; instead, we’ll explain everything in plain English, with plenty of real-world examples.
So, whether you're a seasoned computer user or a complete newbie, this guide is for you. We're going to dive deep into the world of Disk Management, uncovering its secrets and empowering you to take control of your computer's storage. Get ready to say goodbye to storage frustration and hello to a smoothly running, optimized machine! Ready to become a Disk Management master? Let's dive in and discover the hidden power within your Windows 10 system!
How to Use the Windows 10 Disk Management Tool
Understanding Disk Management
The Windows 10 Disk Management tool is a powerful, yet often overlooked, system utility. Think of it as the control center for all things related to storage on your computer. It's the place where you can view, manage, and modify your hard drives and partitions without needing to install any extra software. It allows you to manage internal and external drives connected to your computer.
What Can Disk Management Do?
Disk Management offers a wide range of features, allowing you to perform tasks such as: Creating Partitions: Divide a single physical drive into multiple logical drives. This can be useful for organizing your files, installing multiple operating systems, or creating a separate recovery partition. Formatting Volumes: Prepare a partition or drive for use by an operating system. This process erases all data on the selected volume and sets up the file system. Shrinking Volumes: Reduce the size of a partition, creating unallocated space that can be used to create new partitions or extend existing ones. Extending Volumes: Increase the size of a partition by adding unallocated space to it. This is useful when you're running out of space on a particular drive. Changing Drive Letters: Assign or change the drive letter (e.g., C:, D:, E:) of a partition or drive. This can be helpful for organizing your drives or resolving conflicts. Assigning Mount Points: Mount a drive or partition to an empty folder on another drive. This can be useful for accessing data on a drive without assigning it a drive letter. Deleting Partitions: Remove a partition from a drive, freeing up the space it occupies. This should be done with caution, as it will erase all data on the partition. Converting Disks: Convert a disk between basic and dynamic storage types. This can be useful for advanced storage configurations. Checking Disk Status:View the status of your drives, including their health, capacity, and file system.
Why Use Disk Management?
You might be wondering, "Why should I bother with Disk Management when I can just use File Explorer?" While File Explorer is great for managing files and folders, it doesn't offer the same level of control over your storage devices. Disk Management gives you the ability to: Optimize Storage: Create partitions to better organize files and improve performance. Install Multiple Operating Systems: Create separate partitions for different operating systems, such as Windows and Linux. Increase Drive Capacity: Extend existing partitions to make use of unallocated space. Troubleshoot Storage Issues: Identify and resolve problems with your hard drives and partitions. Prepare New Drives:Format and partition new drives for use with your computer.
Essentially, Disk Management provides granular control over your computer's storage. It allows you to customize the configuration to meet your specific needs.
Accessing Disk Management
Before you can start using Disk Management, you need to know how to access it. Fortunately, there are several ways to open this powerful tool in Windows 10.
Method 1: Using the Start Menu
One of the easiest ways to access Disk Management is through the Start Menu. Here's how:
- Right-click on the Start button (the Windows logo in the bottom-left corner of your screen).
- In the context menu that appears, select "Disk Management".
Method 2: Using the Run Dialog Box
The Run dialog box is another quick and convenient way to launch Disk Management.
- Press the Windows key + R to open the Run dialog box.
- Type `diskmgmt.msc` in the box and press Enter.
Method 3: Using the Control Panel
If you prefer the traditional Control Panel interface, you can access Disk Management through it as well.
- Open the Control Panel. You can do this by searching for "Control Panel" in the Start Menu.
- In the Control Panel, select "System and Security".
- Under "Administrative Tools", click on "Create and format hard disk partitions".
Method 4: Using Command Prompt or Power Shell
For those who prefer using the command line, Disk Management can also be launched through Command Prompt or Power Shell.
- Open Command Prompt or Power Shell as an administrator. You can do this by searching for "Command Prompt" or "Power Shell" in the Start Menu, right-clicking on the result, and selecting "Run as administrator".
- Type `diskmgmt.msc` and press Enter.
No matter which method you choose, Disk Management will open, displaying a list of all the hard drives and partitions connected to your computer.
Navigating the Disk Management Interface
Once you've opened Disk Management, you'll be greeted with its interface, which may seem a bit daunting at first glance. But don't worry, we'll break it down to make it easy to understand.
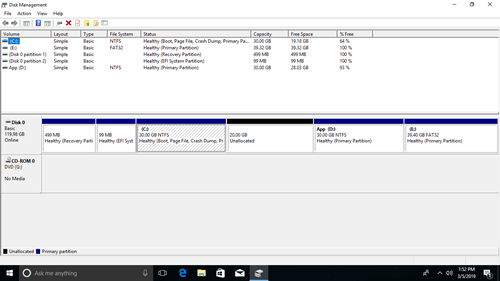
The Disk Management window is divided into two main sections:
Top Section: Volume List
The top section displays a list of all the volumes (partitions) on your computer. Each volume is represented by a row, showing information such as: Volume Name: The name assigned to the volume (e.g., "Windows", "Data"). Layout: The type of disk layout (e.g., "Simple", "Spanned", "Striped"). Type: The type of volume (e.g., "Basic", "Dynamic"). File System: The file system used on the volume (e.g., "NTFS", "FAT32"). Status: The current status of the volume (e.g., "Healthy", "Failed"). Capacity: The total size of the volume. Free Space: The amount of free space available on the volume. % Free: The percentage of free space on the volume. Fault Tolerance: Indicates whether the volume has fault tolerance enabled (e.g., "Yes", "No"). Overhead: The amount of space used for system files and overhead.
Bottom Section: Graphical Representation of Disks
The bottom section provides a graphical representation of your disks and their partitions. Each physical disk is represented by a rectangular block, and the partitions on that disk are shown as smaller blocks within it. This section allows you to visualize the layout of your disks and quickly identify unallocated space or potential issues.
Right-clicking on a volume or disk in either section will bring up a context menu with various options, such as formatting, extending, shrinking, or deleting the volume.
Understanding these two sections is crucial for effectively using Disk Management. The top section provides detailed information about each volume, while the bottom section offers a visual overview of your disk layout.
Basic Operations: Creating, Formatting, and Deleting Partitions
Now that you're familiar with the Disk Management interface, let's dive into some basic operations: creating, formatting, and deleting partitions. These are the fundamental building blocks of managing your storage.
Creating a Partition
Creating a partition allows you to divide a single physical drive into multiple logical drives. This can be useful for organizing your files, installing multiple operating systems, or creating a separate recovery partition.
2.Right-Click and Select "New Simple Volume": Right-click on the unallocated space and select "New Simple Volume". This will launch the New Simple Volume Wizard.
3.Follow the Wizard: The wizard will guide you through the process of creating the partition.
Specify Volume Size: Enter the desired size for the partition in megabytes (MB).
Assign Drive Letter or Path: Choose a drive letter for the partition (e.g., E:, F:, G:) or mount it to an empty folder.
Format Partition: Choose a file system (NTFS is recommended for most users) and enter a volume label (a name for the partition). You can also choose to perform a quick format, which is faster but doesn't check for bad sectors.
4.Click "Finish": Review your settings and click "Finish" to create the partition.
Formatting a Partition
Formatting a partition prepares it for use by an operating system. This process erases all data on the selected volume and sets up the file system.
1.Select the Partition: In the Disk Management interface, right-click on the partition you want to format.
2.Select "Format": In the context menu that appears, select "Format".
3.Choose Formatting Options:
Volume Label: Enter a name for the partition.
File System: Choose a file system (NTFS is generally recommended).
Allocation Unit Size: Leave this at the default setting unless you have a specific reason to change it.
Perform a quick format: Check this box for a faster format. Uncheck it for a full format, which checks for bad sectors but takes longer.
4.Click "OK": A warning message will appear, reminding you that formatting will erase all data on the partition. Click "OK" to proceed.
Deleting a Partition
Deleting a partition removes it from the disk, freeing up the space it occupies.This should be done with caution, as it will erase all data on the partition.
1.Select the Partition: In the Disk Management interface, right-click on the partition you want to delete.
2.Select "Delete Volume": In the context menu that appears, select "Delete Volume".
3.Confirm Deletion: A warning message will appear, reminding you that deleting the volume will erase all data on it. Click "Yes" to confirm.
After deleting a partition, the space it occupied will become unallocated, and you can use it to create a new partition or extend an existing one.
Advanced Operations: Extending, Shrinking, and Converting Disks
Beyond the basic operations, Disk Management offers several advanced features that can help you optimize your storage configuration. Let's explore extending, shrinking, and converting disks.
Extending a Volume
Extending a volume increases the size of a partition by adding unallocated space to it. This is useful when you're running out of space on a particular drive.
1.Identify Unallocated Space: Ensure there is unallocated space adjacent to the partition you want to extend. The unallocated space must be to the right of the partition in the Disk Management interface.
2.Right-Click and Select "Extend Volume": Right-click on the partition you want to extend and select "Extend Volume". This will launch the Extend Volume Wizard.
3.Follow the Wizard: The wizard will guide you through the process of extending the partition.
Select Disks: Choose the disk(s) containing the unallocated space you want to use.
Specify Amount of Space: Enter the amount of space you want to add to the partition in megabytes (MB).
4.Click "Finish": Review your settings and click "Finish" to extend the partition.
Shrinking a Volume
Shrinking a volume reduces the size of a partition, creating unallocated space that can be used to create new partitions or extend existing ones.
1.Select the Partition: In the Disk Management interface, right-click on the partition you want to shrink.
2.Select "Shrink Volume": In the context menu that appears, select "Shrink Volume".
3.Enter Amount to Shrink: Disk Management will query the volume to determine the available shrink space. Enter the amount of space you want to shrink the partition by in megabytes (MB).
4.Click "Shrink": Click "Shrink" to reduce the size of the partition and create unallocated space.
Converting Disks: Basic vs. Dynamic
Disk Management allows you to convert disks between two storage types: basic and dynamic. Understanding the difference between these types is important for making the right choice for your needs.
Basic Disks: Basic disks use a partition table to organize storage. They are the most common type of disk and are compatible with most operating systems. Basic disks support up to four primary partitions or three primary partitions and one extended partition. Dynamic Disks: Dynamic disks use a logical disk manager (LDM) to organize storage. They offer more flexibility than basic disks and support features such as spanned volumes, striped volumes, and mirrored volumes. Dynamic disks do not have the limitations of primary and extended partitions.
Converting to Dynamic Disk
1.Right-Click on the Disk: In the Disk Management interface, right-click on the disk you want to convert to dynamic.
2.Select "Convert to Dynamic Disk": In the context menu that appears, select "Convert to Dynamic Disk".
3.Select Disks to Convert: A dialog box will appear, asking you to select the disk(s) you want to convert.
4.Click "OK": Click "OK" to start the conversion process.
Converting to Basic Disk
To convert a dynamic disk back to a basic disk, you must first delete all volumes on the dynamic disk.
1.Delete All Volumes: Delete all volumes on the dynamic disk.
2.Right-Click on the Disk: In the Disk Management interface, right-click on the disk you want to convert to basic.
3.Select "Convert to Basic Disk": In the context menu that appears, select "Convert to Basic Disk".
Troubleshooting Common Issues
While Disk Management is a powerful tool, you might encounter some issues along the way. Here are some common problems and how to troubleshoot them.
"The Operation Is Not Supported"
This error message often appears when you try to perform an operation that is not supported on the selected volume or disk. This can happen for several reasons: Insufficient Free Space: Make sure there is enough unallocated space available to perform the operation. File System Limitations: Some file systems have limitations on the size of partitions or the types of operations that can be performed. Disk Type: Some operations are only supported on basic or dynamic disks. System Partitions: You cannot modify or delete system partitions that are essential for booting your computer.
Solution
Check the available free space on the disk.
Ensure that the file system supports the operation you are trying to perform.
Verify that the disk type (basic or dynamic) is compatible with the operation.
Avoid modifying or deleting system partitions.
"Invalid Dynamic Disk"
This error message indicates that there is a problem with the dynamic disk configuration. This can happen if the disk has been disconnected or if there is corruption in the LDM database.
Solution
Reconnect the Disk: If the disk has been disconnected, reconnect it to your computer. Reactivate the Disk: In Disk Management, right-click on the disk and select "Reactivate Disk". Import Foreign Disks:If you have moved a dynamic disk from another computer, you may need to import it. In Disk Management, right-click on any disk and select "Import Foreign Disks".
"Volume Is Too Fragmented"
This error message indicates that the volume is too fragmented to be shrunk or extended. Fragmentation occurs when files are scattered across the disk, making it difficult to allocate contiguous space.
Solution
Defragment the Volume: Use the Windows Disk Defragmenter to defragment the volume. You can find this tool by searching for "defragment" in the Start Menu.
Drive Letter Conflicts
Sometimes, two or more drives may be assigned the same drive letter, causing conflicts. This can prevent you from accessing one or both of the drives.
Solution
Change Drive Letters: In Disk Management, right-click on the volume with the conflicting drive letter and select "Change Drive Letter and Paths". Assign a unique drive letter to the volume.
By understanding these common issues and their solutions, you can effectively troubleshoot problems that may arise while using Disk Management.
Congratulations, you've made it to the end of this comprehensive guide on using the Windows 10 Disk Management tool! Hopefully, this article has demystified the process and empowered you to take control of your computer's storage.
We've covered a lot of ground, from understanding the basics of Disk Management and navigating its interface to performing fundamental operations like creating, formatting, and deleting partitions. We've also explored advanced features such as extending and shrinking volumes, converting disks, and even troubleshooting common issues. The key takeaway is that Disk Management is a powerful tool that puts you in the driver's seat when it comes to managing your hard drives.
Now that you have this knowledge, don't be afraid to experiment and try out the different features. Remember to always back up your data before making any major changes to your disk configuration, just in case something goes wrong. With a little practice, you'll become a Disk Management pro in no time!
Ready to put your newfound knowledge to the test? Go ahead and open Disk Management on your Windows 10 machine and start exploring! Whether you want to create a new partition, extend an existing one, or simply get a better understanding of your storage layout, Disk Management is the perfect tool for the job.
So, what are you waiting for? Take the plunge and unlock the full potential of your hard drives! And if you have any questions or run into any issues, don't hesitate to reach out to the tech community for help. Happy disk managing! Do you feel ready to use disk management today?
Post a Comment for "How to Use the Windows 10 Disk Management Tool"
Post a Comment