How to Use the Windows 10 Device Guard for Enhanced Security
How to Fortify Your Windows 10 Fortress with Device Guard
Hey there, security-conscious friends! Ever feel like your digital life is a castle under siege, constantly bombarded by sneaky malware and persistent threats? You're not alone! In today's hyper-connected world, keeping our personal and professional data safe is more crucial than ever. We're talking about protecting everything from your embarrassing cat videos (we all have them!) to your company's top-secret burrito recipe (okay, maybe not that secret). But seriously, think about the potential damage a single breach can cause – identity theft, financial loss, and a whole lot of stress. It's enough to make you want to unplug everything and live off the grid, right?
But before you start packing your bags for a remote cabin, let's talk about a powerful weapon in your cybersecurity arsenal: Windows 10 Device Guard. Now, I know what you're thinking: "Device Guard? Sounds like something out of a sci-fi movie!" And you're not entirely wrong. It's a seriously impressive security feature built right into Windows 10 that can dramatically reduce your risk of malware infections and other security threats. Imagine it as a super-vigilant bouncer for your computer, only allowing trusted applications and processes to run, while keeping the riff-raff – the malware, the viruses, the dodgy downloads – firmly outside the velvet rope.
Think of it this way: remember that time you downloaded a "free" screen saver that turned out to be a Trojan horse in disguise? Yeah, Device Guard would have stopped that dead in its tracks. It's like having a hyper-aware security guard who knows exactly who's allowed in and who's not. This isn't just about antivirus software anymore; it's about taking a proactive approach to security. It's about saying, "Hey, I'm not just going to wait for the bad guys to try and break in; I'm going to build a fortress that's virtually impenetrable."
But here's the thing: Device Guard isn't just some magical shield you can activate with a single click. It requires some configuration and planning to get it up and running properly. And that's where things can get a little… technical. Fear not, though! We're here to break it down for you in plain English, without all the confusing jargon. We’ll show you how to harness the power of Device Guard and transform your Windows 10 machine into a security powerhouse.
So, are you ready to level up your security game and take control of your digital destiny? Stick around, because we're about to dive deep into the world of Windows 10 Device Guard and unlock its secrets. We’ll show you exactly how to implement it, step-by-step, so you can rest easy knowing your computer is protected by one of the most advanced security features available. Let's get started!
Dive Deep into Device Guard: A Comprehensive Guide
Alright, friends, let's get down to brass tacks. Device Guard is a powerful security feature in Windows 10, but it's not exactly plug-and-play. It requires a bit of understanding and configuration to truly unleash its potential. Think of it as building a custom security system for your home – you need to know where to place the cameras, how to configure the alarms, and how to set the access codes. Similarly, with Device Guard, you need to understand its components, how to configure them, and how to manage the policies to effectively protect your system.
The main issue many users face is the complexity involved in setting up Device Guard. It’s not something you can just switch on and forget about. It requires understanding concepts like code integrity policies, virtualization-based security (VBS), and Unified Extensible Firmware Interface (UEFI) Secure Boot. Many tutorials online are overly technical and assume a high level of prior knowledge, leaving many users feeling lost and overwhelmed. Moreover, incorrect configuration can lead to system instability or prevent legitimate applications from running, causing frustration and potentially hindering productivity. Therefore, it’s essential to approach Device Guard implementation with a clear understanding of the steps involved and their potential impact on your system.
Here's a breakdown of how to get it done, without making it feel like you're learning a new programming language. Remember, the goal is to allow only trusted code to run on your system, effectively blocking malware and other unwanted software. Think of it as creating a whitelist of approved applications and drivers, and blocking everything else by default. This approach is much more effective than relying solely on antivirus software, which often struggles to keep up with the ever-evolving threat landscape.
Enable Virtualization-Based Security (VBS)
VBS is the foundation upon which Device Guard operates. It uses hardware virtualization to create a secure environment where code integrity policies can be enforced. This means that even if malware manages to bypass other security measures, it won't be able to tamper with the core system processes protected by VBS.
• Check System Compatibility: Before enabling VBS, ensure your system meets the hardware and software requirements. This typically includes a 64-bit processor with virtualization extensions (Intel VT-x or AMD-V), sufficient RAM (at least 8GB is recommended), and a compatible version of Windows 10 (Enterprise, Education, or Professional). You can use the System Information tool (msinfo32.exe) to check your processor and Windows edition.
• Enable Virtualization in BIOS/UEFI: Access your computer's BIOS/UEFI settings (usually by pressing Delete, F2, or F12 during startup). Look for virtualization options (e.g., Intel Virtualization Technology, AMD-V) and enable them. The exact wording and location of these settings may vary depending on your motherboard manufacturer. Save the changes and exit the BIOS/UEFI setup.
• Enable Hyper-V: Hyper-V is Microsoft's virtualization platform, and it's required for VBS to function. You can enable it through the Control Panel:
- Go to "Programs and Features."
- Click "Turn Windows features on or off."
- Check the box next to "Hyper-V" and click OK.- Your system will restart to complete the installation.
• Verify VBS is Running: After enabling Hyper-V and restarting your computer, verify that VBS is running correctly. Open the System Information tool (msinfo32.exe) again and look for the "Virtualization-based security" entry. If it says "Running," you're good to go! If it says "Not enabled," double-check your BIOS/UEFI settings and Hyper-V configuration.
Create a Code Integrity Policy
The code integrity policy is the heart of Device Guard. It defines which applications and drivers are allowed to run on your system. Think of it as a detailed list of approved software, with everything else being blocked by default. Creating a robust and accurate code integrity policy is crucial for the effectiveness of Device Guard.
• Audit Mode: Start by creating a code integrity policy in audit mode. This allows you to monitor which applications are being used on your system without actually blocking anything. This is a crucial step to avoid accidentally blocking legitimate software that you rely on. To create the policy, you can use the Power Shell cmdlet New-CIPolicy:
- Open Power Shell as an administrator.
- Run the following command: `New-CIPolicy -Level Publisher -File Path C:\Policies\Audit Policy.xml -Scan Path C:\`
- This command creates a policy named Audit Policy.xml in the C:\Policies folder, scanning the entire C:\ drive for installed applications. The -Level Publisher parameter tells the policy to trust applications based on their digital signatures.
• Analyze the Audit Logs: After running the system in audit mode for a while (e.g., a week or two), analyze the audit logs to identify any applications that are not covered by the policy. You can use the Get-CIPolicy Log cmdlet to view the logs:
- Open Power Shell as an administrator.
- Run the following command: `Get-CIPolicy Log -File Path C:\Policies\Audit Policy.xml`
- This command will display a list of applications that would have been blocked if the policy were in enforced mode. Review this list carefully and determine whether any of these applications are legitimate and should be added to the policy.
• Merge Existing Policies (If Necessary): If you have multiple code integrity policies, you can merge them into a single policy using the Merge-CIPolicy cmdlet:
- Open Power Shell as an administrator.
- Run the following command: `Merge-CIPolicy -Policy Paths C:\Policies\Policy1.xml, C:\Policies\Policy2.xml -Output File Path C:\Policies\Merged Policy.xml`
- This command merges Policy1.xml and Policy2.xml into a single policy named Merged Policy.xml.
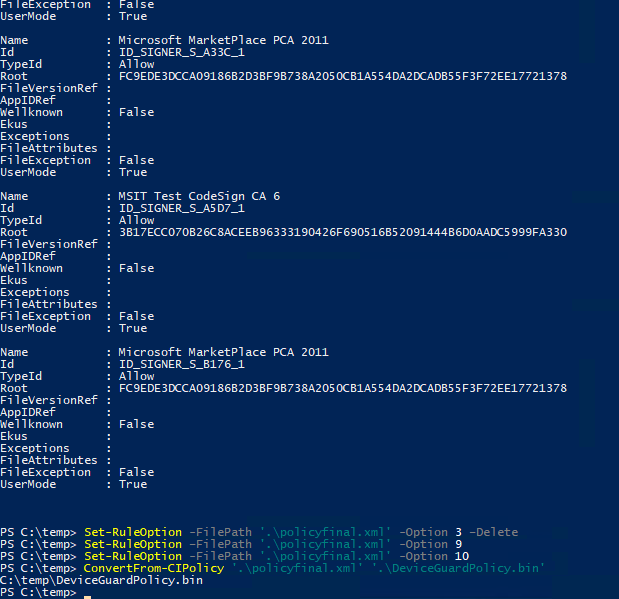
• Convert to Enforced Mode: Once you're confident that your code integrity policy covers all legitimate applications, you can convert it to enforced mode. This will actually start blocking any applications that are not covered by the policy. To convert the policy, use the Convert From-CIPolicy cmdlet:
- Open Power Shell as an administrator.
- Run the following command: `Convert From-CIPolicy -File Path C:\Policies\Audit Policy.xml -Output File Path C:\Policies\Enforced Policy.bin`
- This command converts Audit Policy.xml to a binary file named Enforced Policy.bin, which is the format required for enforced mode.
Deploy the Code Integrity Policy
Now that you have a code integrity policy in enforced mode, you need to deploy it to your system. This involves copying the policy file to the correct location and configuring Windows to use it.
• Copy the Policy File: Copy the Enforced Policy.bin file to the C:\Windows\System32\Code Integrity folder.
• Configure the Policy: You can configure the policy using Group Policy or the Registry Editor.
- Group Policy (Recommended for Domain-Joined Computers):
- Open the Group Policy Editor (gpedit.msc).
- Navigate to "Computer Configuration" -> "Windows Settings" -> "Security Settings" -> "Application Control Policies" -> "Code Integrity."
- Right-click on "Code Integrity" and select Properties.- Check the box next to "Define this policy" and select Enabled.- Under "Options," select "Allow Store apps" and "Allow Windows components."
- Click OK.- Registry Editor (For Standalone Computers):
- Open the Registry Editor (regedit.exe).
- Navigate to the following key: `HKEY_LOCAL_MACHINE\SYSTEM\Current Control Set\Control\CI\Policy`
- Create a new binary value named "CIEnabled" and set its value to 1.
- Restart your computer.
• Test the Policy: After deploying the policy, test it thoroughly to ensure that it's working as expected. Try running some applications that are not covered by the policy to see if they are blocked. Also, verify that all legitimate applications are still running correctly.
Maintain and Update the Policy
Device Guard is not a set-it-and-forget-it solution. You need to maintain and update the code integrity policy regularly to ensure that it continues to protect your system effectively. This involves monitoring the audit logs, adding new applications to the policy as needed, and removing any applications that are no longer used.
• Monitor Audit Logs: Regularly monitor the audit logs for any applications that are being blocked. If you find any legitimate applications that are being blocked, add them to the policy.
• Update the Policy: As new applications are installed or updated, you need to update the code integrity policy to include them. You can use the same steps as described above to create a new policy or merge existing policies.
• Revoke Certificates: If you discover that an application or driver is malicious, you can revoke its certificate to prevent it from running on your system. This involves adding the certificate to the disallowed certificate list.
• Remember those "free" programs we talked about earlier? Device Guard will keep them at bay, preventing them from even attempting to install and wreak havoc. It also protects against malicious scripts and macros that can be embedded in documents or email attachments. These types of attacks are becoming increasingly common, but Device Guard can effectively block them by preventing unauthorized code from running.
By implementing these steps, you can significantly enhance the security of your Windows 10 system with Device Guard. It requires some effort and attention to detail, but the peace of mind it provides is well worth it. Think of it as an investment in your digital security, protecting you from the ever-evolving threats that lurk in the online world. Now, go forth and fortify your digital fortress!
Frequently Asked Questions About Device Guard
Let's address some common questions that might be swirling around in your head about Device Guard.
• Question: Is Device Guard only for large enterprises, or can individuals benefit from it too?
- Answer: While Device Guard is often associated with enterprise environments due to its advanced security features, individuals can absolutely benefit from it. If you're concerned about malware, viruses, and other security threats, Device Guard can provide an extra layer of protection for your personal computer.
• Question: What happens if Device Guard blocks an application that I need to use?
- Answer: If Device Guard blocks a legitimate application, you'll need to add it to the code integrity policy. This involves identifying the application, analyzing its digital signature, and adding it to the list of approved software. We covered the basics of this in the article, but you may need to do some further research or consult with a security professional if you're unsure how to proceed.
• Question: Does Device Guard replace traditional antivirus software?
- Answer: Device Guard is not a replacement for traditional antivirus software, but rather a complement to it. Antivirus software relies on detecting known malware signatures, while Device Guard prevents unauthorized code from running in the first place. Using both Device Guard and antivirus software provides a more comprehensive security solution.
• Question: Is Device Guard compatible with all versions of Windows 10?
- Answer: Device Guard is primarily available in the Enterprise, Education, and Professional versions of Windows 10. The Home version does not include Device Guard.
Closing: Secure Your Digital World with Device Guard
Well, friends, we've reached the end of our journey into the world of Windows 10 Device Guard. We've explored its potential, dissected its components, and walked through the steps to implement it. We've seen how Device Guard can act as a vigilant guardian, protecting your system from malware and other security threats by only allowing trusted code to run. It's like building a digital fortress around your data, ensuring that only authorized applications and processes can enter. This isn't just about preventing infections; it's about proactively controlling what runs on your system and minimizing your attack surface.
But knowledge is only powerful when put into action. So, here's your call to adventure: take what you've learned today and start fortifying your Windows 10 system with Device Guard. Begin by assessing your system's compatibility and enabling Virtualization-Based Security (VBS). Then, create a code integrity policy in audit mode to identify the applications you rely on. Once you're confident that your policy covers all legitimate software, convert it to enforced mode and deploy it to your system. Remember to maintain and update the policy regularly to ensure it remains effective against emerging threats.
Don't let the complexity of Device Guard intimidate you. Break it down into manageable steps, and don't be afraid to seek help if you get stuck. The effort you invest in securing your system will pay off in the long run, protecting you from the financial loss, identity theft, and emotional stress that can result from a security breach. By taking proactive steps to protect your digital assets, you're empowering yourself to navigate the online world with confidence and peace of mind.
So, go forth and transform your Windows 10 machine into a security powerhouse! Embrace the power of Device Guard and take control of your digital destiny. You have the tools, you have the knowledge, and you have the motivation. Now, it's time to build that digital fortress and safeguard your valuable data.
Remember, the online world can be a dangerous place, but with the right tools and knowledge, you can protect yourself and your data from harm. Device Guard is a powerful weapon in your cybersecurity arsenal, so don't hesitate to use it. Now that you know how to use Windows 10 Device Guard for enhanced security, what steps will you take today to implement it on your system?
Post a Comment for "How to Use the Windows 10 Device Guard for Enhanced Security"
Post a Comment