How to Use the Windows 11 TPM (Trusted Platform Module) Features
Unlock Enhanced Security: Mastering Windows 11 TPM Features
Hey there, tech enthusiasts! Ever feel like your computer is holding secrets, but you're not quite sure how to unlock its full potential? Think of your Windows 11 PC like a high-tech vault, and the TPM (Trusted Platform Module) is its ultimate security guard. Now, I know what you might be thinking: "TPM? Sounds like something out of a sci-fi movie!" But trust me, it's much more down-to-earth and incredibly useful. It's that little chip doing all the heavy lifting when it comes to keeping your data safe.
Imagine this: You're at a coffee shop, sipping your latte, and working on a super important document. Suddenly, someone tries to sneak a peek at your screen or, even worse, attempts to hack into your laptop. That's where the TPM comes to the rescue! It's like having a built-in bodyguard for your sensitive information, ensuring that only you have access to it. You might've heard whispers about TPM when Windows 11 first came out. Remember the great TPM panic of '21? Yeah, that was a thing. Everyone was scrambling to figure out if their PCs were "worthy" enough to run the new OS. But let’s face it, most of us just clicked "OK" during the installation process without really understanding what TPM does. Or maybe you're one of those people who's been putting off upgrading because you're intimidated by all the tech jargon. No worries, we’ve all been there! It's like trying to assemble IKEA furniture without the instructions – frustrating, to say the least. But don't worry, because, in this blog post, we’re going to break it all down in plain English.
So, what exactly is this TPM thing, and why should you care? Simply put, it's a security chip that helps protect your computer from various threats. Think of it as a super-secure key storage for your passwords, encryption keys, and other sensitive data. This ensures that your system hasn't been tampered with before booting up. In a world where cyber threats are becoming more sophisticated every day, having a TPM is like adding an extra layer of armor to your digital fortress. It’s a physical chip on your motherboard (or sometimes integrated into your CPU) that acts as a hardware-based security module. Now, some of you might be thinking, "I already have antivirus software, isn't that enough?" Well, antivirus software is like having a security camera watching your house, while TPM is like having a steel door with a sophisticated locking mechanism. They work together to provide comprehensive security.
For example, let’s say you're a small business owner. You store all your customer data, financial records, and trade secrets on your computer. A data breach could be catastrophic, potentially costing you thousands of dollars and damaging your reputation. With TPM enabled, your data is encrypted and protected from unauthorized access, even if someone manages to physically steal your computer. Or imagine you're a student working on your thesis. You've spent months researching and writing, and the thought of losing all that work is terrifying. TPM can help protect your files from ransomware attacks, ensuring that your hard work remains safe and secure.
But here's the thing: having a TPM chip is only half the battle. You need to know how to use it effectively to get the most out of its security features. That's where this guide comes in. We're going to walk you through everything you need to know about using the TPM features in Windows 11, from checking if you have a TPM to configuring it for optimal security. We'll cover topics like:
• How to check if TPM is enabled on your system.
• How to enable TPM in your BIOS/UEFI settings.
• Using TPM for Bit Locker drive encryption.
• Setting up Windows Hello for secure login.
• Troubleshooting common TPM issues.
We'll also throw in some real-world examples and practical tips along the way to make it as easy as possible. This blog post is your one-stop guide to mastering the Windows 11 TPM features, regardless of your technical expertise. So, whether you're a seasoned techie or a complete beginner, stick around, and let's dive into the world of TPMs together. By the end of this article, you'll be able to confidently wield the power of TPM and fortify your Windows 11 system against the ever-growing landscape of cyber threats. Ready to unlock the full security potential of your Windows 11 PC and sleep soundly knowing your data is safe and sound? Let’s get started!
Unlocking Windows 11 TPM Features: A Comprehensive Guide
Alright, let's get down to business. You've got Windows 11, you've (hopefully) got a TPM, but how do you actuallyuseit? Don’t sweat it; we will show you how to actually tap into its power.
Checking if TPM is Enabled: Your First Line of Defense
Before we dive into the nitty-gritty, let’s make sure your TPM is actually awake and ready to go. It's like checking if your alarm clock is set before going to bed – essential for a good night's sleep (or, in this case, a secure computing experience).
- Accessing TPM Management:
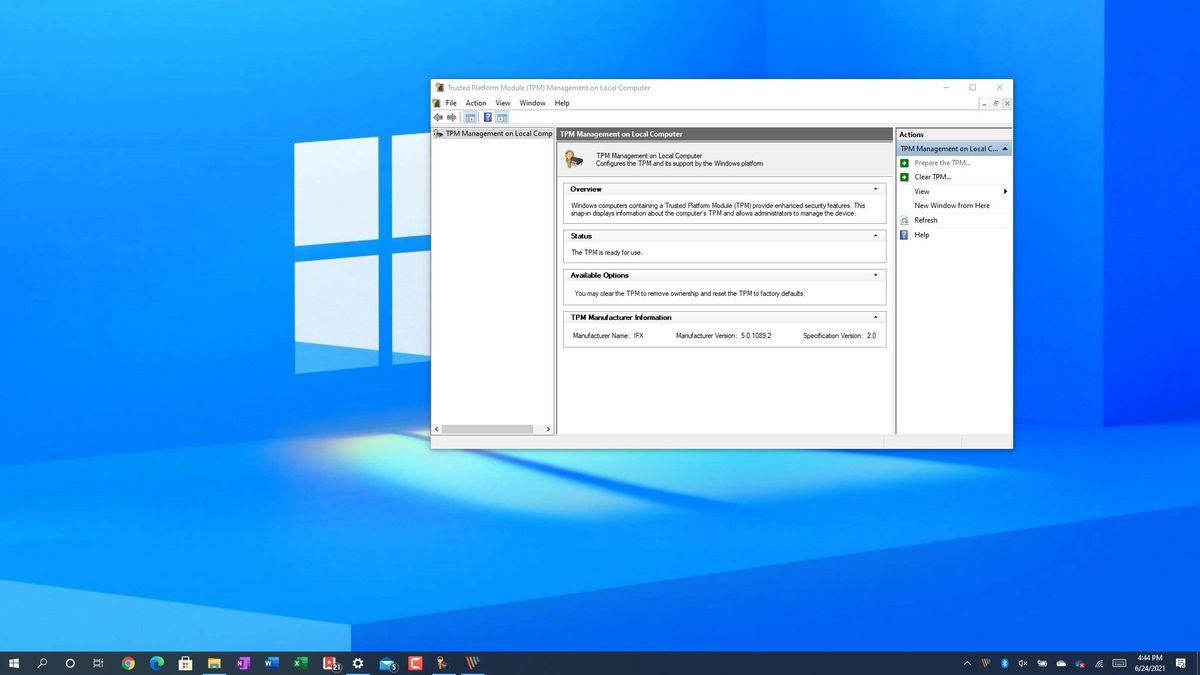
The easiest way to check is to hit the Windows key, type "tpm.msc," and hit Enter. This opens the TPM Management console. If you see a message saying "Compatible TPM cannot be found," then Houston, we have a problem. It either means you don't have a TPM, it's disabled in your BIOS/UEFI, or Windows isn't detecting it properly.
- Checking Device Manager:
Another way is through Device Manager. Right-click the Start button, select "Device Manager," and look for "Security devices." If you see "Trusted Platform Module 2.0" (or a similar version number), then you're in luck! It means your TPM is present and accounted for.
- Using Power Shell:
For the command-line aficionados out there, Power Shell is your friend. Open Power Shell as administrator (right-click the Start button, select "Windows Power Shell (Admin)"), and type
Get-Tpm. This command will give you detailed information about your TPM, including its presence, version, and status.
Enabling TPM in BIOS/UEFI: Waking the Sleeping Giant
So, you've discovered that your TPM is snoozing. Don't worry, we can wake it up! This usually involves diving into your computer's BIOS/UEFI settings. Now, this can be a bit intimidating, but trust me, it's not as scary as it sounds.
- Accessing BIOS/UEFI:
First, you need to access your BIOS/UEFI settings. This usually involves pressing a specific key while your computer is booting up. The key varies depending on your manufacturer, but it's often Del, F2, F12, or Esc. Consult your motherboard manual or search online for your specific model to find the right key. Pro tip: start mashing the key repeatedly as soon as you power on your PC. You'll get there eventually!
- Finding the TPM Setting:
Once you're in the BIOS/UEFI, navigate to the "Security" or "Advanced" section. Look for settings related to "TPM," "Trusted Platform Module," "Intel PTT," or "AMD f TPM." The exact name and location will vary depending on your motherboard manufacturer. Enable the TPM and save the changes. Your computer will restart, and hopefully, your TPM will now be recognized by Windows.
- Dealing with Firmware Issues:
Sometimes, even after enabling TPM in BIOS/UEFI, Windows might still not recognize it. This could be due to outdated firmware. Check your motherboard manufacturer's website for firmware updates and install them if available. This can often resolve compatibility issues and ensure that your TPM is working correctly.
Bit Locker Drive Encryption: Your Digital Vault
Now that your TPM is awake and kicking, let’s put it to work with Bit Locker. Bit Locker is a full-disk encryption feature built into Windows that uses the TPM to protect your data. It’s like wrapping your entire hard drive in a digital vault, making it virtually impossible for unauthorized users to access your files.
- Enabling Bit Locker:
To enable Bit Locker, go to Control Panel -> System and Security -> Bit Locker Drive Encryption. Select the drive you want to encrypt (usually your C: drive) and click "Turn on Bit Locker." Windows will guide you through the process, which involves choosing a recovery method (either a password or a recovery key) and encrypting your drive. Make sure to store your recovery key in a safe place, like a password manager or a USB drive, because if you lose it, you'll be locked out of your own data!
- Using TPM for Seamless Unlock:
One of the coolest things about using TPM with Bit Locker is that it can automatically unlock your drive when you start your computer. This means you don't have to enter a password every time you boot up. To enable this feature, make sure you've selected the "Use my TPM to automatically unlock my drive" option during the Bit Locker setup process.
- Performance Considerations:
Encrypting your drive with Bit Locker can have a slight impact on performance, especially on older computers. However, modern CPUs have built-in hardware acceleration for encryption, which minimizes the performance hit. If you notice a significant slowdown, consider upgrading your hardware or disabling Bit Locker on drives that don't contain sensitive data.
Windows Hello: Secure Login Made Easy
Tired of typing in your password every time you log in? Windows Hello lets you use your face, fingerprint, or PIN to unlock your computer. And guess what? TPM plays a crucial role in securing your Windows Hello credentials.
- Setting Up Windows Hello:
To set up Windows Hello, go to Settings -> Accounts -> Sign-in options. You'll see options for face recognition, fingerprint recognition, and PIN. Choose your preferred method and follow the on-screen instructions. Windows will guide you through the process of scanning your face or fingerprint and creating a secure PIN.
- TPM's Role in Authentication:
When you use Windows Hello, your biometric data or PIN is stored securely within the TPM. This prevents hackers from stealing your credentials and using them to access your account. It’s like having a super-secure vault inside your computer that only you can open with your face or fingerprint.
- Enhancing Security with PIN:
Even if you use face or fingerprint recognition, it's a good idea to set up a PIN as a backup. This provides an extra layer of security in case your biometric data is compromised or unavailable (e.g., if you're wearing a mask or your fingerprint scanner is not working properly).
Troubleshooting Common TPM Issues: When Things Go Wrong
Sometimes, things don't go as planned. You might encounter errors, warnings, or just general weirdness when using TPM. Here are some common issues and how to fix them:
- TPM Not Detected:
If Windows doesn't detect your TPM, even after enabling it in BIOS/UEFI, try updating your motherboard firmware or reinstalling the TPM drivers. You can find the latest drivers on your motherboard manufacturer's website.
- TPM Malfunction:
If your TPM is malfunctioning, you might see error messages or experience unexpected crashes. In this case, try clearing the TPM. This will erase all the data stored in the TPM, including your Bit Locker keys and Windows Hello credentials, so make sure you have backups before doing this.
- Bit Locker Recovery Key Issues:
If you're locked out of your drive because you've forgotten your Bit Locker password or lost your recovery key, you're in a tough spot. Unfortunately, there's no way to recover your data without the recovery key. This is why it's so important to store it in a safe place.
So, there you have it! A comprehensive guide to using the Windows 11 TPM features. It might seem like a lot to take in, but once you get the hang of it, you'll be well on your way to securing your computer like a pro. Remember, security is an ongoing process, not a one-time fix. Stay vigilant, keep your software up to date, and always be aware of the latest threats.
By understanding and utilizing the TPM features in Windows 11, you're taking a proactive step towards protecting your data and privacy. It's like investing in a good home security system – it gives you peace of mind and protects you from potential threats. So, go ahead, explore the world of TPMs, and unlock the full security potential of your Windows 11 PC. Your data will thank you for it!
Additional Tips for Enhanced Security
Beyond the core TPM features, consider these additional tips to fortify your Windows 11 system:
- Enable Secure Boot:
Secure Boot helps prevent malware from loading during startup by verifying the digital signatures of boot files.
- Use a Strong Password:
A strong password is the foundation of good security. Use a combination of uppercase and lowercase letters, numbers, and symbols.
- Keep Your Software Up to Date:
Regularly update your operating system, antivirus software, and other applications to patch security vulnerabilities.
- Be Wary of Phishing Scams:
Phishing scams are designed to trick you into giving away your personal information. Be cautious of suspicious emails and websites.
TPM and the Future of Security
TPM is not just a buzzword; it's a critical component of modern computer security. As cyber threats continue to evolve, TPM will play an increasingly important role in protecting our data and privacy.
- Hardware-Based Security:
TPM provides a hardware-based security layer that is more resistant to attacks than software-based solutions.
- Enhanced Authentication:
TPM enables stronger authentication methods, such as multi-factor authentication, to prevent unauthorized access.
- Data Integrity:
TPM helps ensure the integrity of your data by detecting tampering and preventing unauthorized modifications.
Frequently Asked Questions (FAQ) About Windows 11 TPM
Let's tackle some common questions you might have about using TPM in Windows 11.
Q1: Do I really need TPM to run Windows 11?
A: Technically, yes. Microsoft has made TPM 2.0 a requirement for Windows 11. However, there are ways to bypass this requirement (unofficially, of course), but it's generally not recommended. Using Windows 11 without TPM means you're missing out on key security features, making your system more vulnerable to attacks.
Q2: How do I know if my TPM is version 2.0?
A: You can check your TPM version using the Get-Tpm command in Power Shell. Look for the "Tpm Specification Version" property. It should say "2.0" if you have a TPM
2.0 module. Alternatively, in the TPM Management console (tpm.msc), it should state the specification version.
Q3: Can I upgrade my TPM if I have an older version?
A: Unfortunately, no. TPM is a hardware component, so you can't upgrade it like you would upgrade software. If you have an older TPM version (e.g., 1.2), you'll need to replace your motherboard with one that has a TPM
2.0 module.
Q4: Is TPM only for Windows?
A: No, TPM is not exclusive to Windows. It's a general-purpose security chip that can be used by other operating systems, such as Linux. In fact, many Linux distributions support TPM for features like full-disk encryption and secure boot.
Hopefully, these FAQs have cleared up some of your doubts about TPM. If you have any other questions, feel free to ask in the comments section below!
In conclusion, friends, enabling and utilizing the Trusted Platform Module (TPM) features in Windows 11 is more than just ticking a box – it's about fortifying your digital life. We journeyed through the process, from verifying TPM presence to leveraging it for Bit Locker and Windows Hello. You've armed yourself with the knowledge to protect your data. Now, put this knowledge into action! Take a few minutes to ensure your TPM is enabled and configured correctly.
Is your system truly secure? It starts with you taking that first step towards better protection.
 Features)
Post a Comment for "How to Use the Windows 11 TPM (Trusted Platform Module) Features"
Post a Comment