How to Use the Windows 10 Windows Sandbox Feature (if available)
Unlock Risk-Free Exploration: Mastering Windows 10 Sandbox.
Hey there, tech explorers! Ever feel like you're tiptoeing through a minefield every time you download a new program? Or perhaps you’ve stumbled upon a mysterious file attachment that makes you raise an eyebrow? We've all been there – that moment of hesitation before clicking "install" or opening a file, wondering if this is the moment your computer decides to stage a dramatic meltdown. It's like ordering a spicy dish – you're excited for the flavor, but slightly terrified of the potential aftermath.
Let's face it, the internet is a wild west. There's incredible stuff out there, but also lurking dangers that can wreak havoc on your system. Think of it as that one friend who always recommends the "coolest" new website or software, but never seems to remember the last time they had to reinstall their entire operating system. We love them, but we don’t always trust their judgment, right? We need our own personal digital bodyguard, something that lets us experiment and explore without jeopardizing our precious data and meticulously organized desktops. Windows 10, in its infinite wisdom (or perhaps its desire to avoid endless tech support calls), introduced a feature that acts exactly like that: the Windows Sandbox.
What is this magical Sandbox, you ask? Imagine a virtual playground where you can run programs, test software, and open suspicious files with absolutely zero consequences for your actual computer. It's like having a digital panic room! Anything that happens in the Sandbox stays in the Sandbox. Close the window, and it's all gone – poof! Vanished! Like a magician's trick, but without the questionable hairpiece.
Think of it as renting a temporary apartment specifically for testing out questionable roommates (in this case, software). You can throw a party, paint the walls purple, and generally cause mayhem, and when you move out, the apartment complex is none the wiser, and your real home remains pristine. This is why the Windows Sandbox is a game-changer for anyone who values their computer's stability (and sanity!).
But here's the catch: not everyone has access to this awesome tool. Just like that exclusive club with the velvet rope, the Windows Sandbox is a bit picky about who it lets in. You need a specific version of Windows 10 (Pro or Enterprise), and your computer needs to meet certain hardware requirements. Don't worry, we'll dive into those details later. But if you qualify, you're in for a treat. A risk-free, consequence-free, explore-to-your-heart's-content treat!
So, are you ready to unlock the secrets of the Windows 10 Sandbox and finally ditch the anxiety every time you download something new? Let's jump in and learn how to harness this powerful feature and turn your computer into a playground for safe exploration. Trust me, once you start using the Sandbox, you'll wonder how you ever lived without it. Let's get started!
Harnessing the Power of Windows 10 Sandbox: A Comprehensive Guide
The Windows 10 Sandbox is your personal digital laboratory, offering a safe and isolated environment to test software, explore potentially risky websites, and open untrusted files without jeopardizing your primary operating system. This is particularly useful in today's environment, where cyber threats are becoming more sophisticated and prevalent.
Before we dive into the how-to, let's explore some of the compelling reasons why you should be using the Windows Sandbox.
Why You Need the Windows 10 Sandbox
-
Safe Software Testing
Imagine you're a software developer or a tech enthusiast eager to try out the latest beta version of a program. Instead of installing it directly on your system and risking instability or conflicts, you can run it in the Sandbox. This allows you to thoroughly test the software without affecting your main environment. Real-world example: A developer testing a new plugin for a popular graphic design software can ensure it doesn't crash the system or corrupt existing files.
-
Exploring Untrusted Websites
Ever been tempted to visit a website that looks a little… shady? Perhaps a link from an unfamiliar email or a banner ad promising unbelievable deals? The Sandbox provides a secure environment to explore these websites without fear of malware infections. The Sandbox isolates your main system, preventing any malicious scripts from gaining access. Case Study: A user received a link to a website offering a free software download. Suspicious, they opened the link in the Sandbox. The site immediately tried to download a malicious file, but the Sandbox prevented it from reaching the main system, averting a potential disaster.
-
Opening Suspicious Files
Received an email attachment from an unknown sender? Or perhaps a file from a source you don't fully trust? Opening these files directly can be risky. The Sandbox allows you to open and examine these files in a controlled environment, ensuring they don't contain viruses or other malicious code. Think of it as a digital quarantine zone. Example: An employee received a resume file from an unverified source. Opening it in the Sandbox revealed it contained a macro virus designed to steal login credentials. The employee was able to safely analyze the file and alert the IT department, preventing a potential security breach.
-
Clean Environment for Troubleshooting
Sometimes, your computer might be acting up, and you're not sure what's causing the problem. The Sandbox provides a clean, pristine environment to troubleshoot software conflicts or system issues. By running programs in the Sandbox, you can isolate potential problems and identify the root cause of the issue. This is particularly helpful in eliminating the influence of background processes or installed software. Real-world use: IT support staff can use the sandbox to replicate user reported problems in a clean, controlled environment without modifying their own workstation. This helps to identify the source of the problem, and test fixes.
-
Temporary Workspace
Need a clean slate for a specific task? The Sandbox can be used as a temporary workspace, free from your usual clutter and distractions. This is ideal for tasks like editing sensitive documents or working on a project that requires a specific software configuration. Once you close the Sandbox, the environment is wiped clean, leaving no trace on your main system. Example: A consultant working on a confidential project can use the sandbox to store and edit sensitive documents without risking data leakage on their personal computer.
Checking System Requirements for Windows Sandbox
Before getting started, let's make sure your system is eligible for the Windows Sandbox. Here's a quick rundown:
-
Windows 10 Pro or Enterprise
Unfortunately, the Windows Sandbox is not available on the Home edition of Windows 10. You'll need to be running either the Pro or Enterprise version.
-
64-bit Architecture
Your system must be running a 64-bit version of Windows 10. If you're unsure, you can check this by going to Settings > System > About.
-
Virtualization Enabled
Virtualization needs to be enabled in your BIOS or UEFI settings. This allows your computer to run virtual machines, which is how the Sandbox operates.
-
At Least 4GB of RAM
While the Sandbox can technically run with less, 4GB of RAM is recommended for optimal performance. More RAM will provide a smoother and more responsive experience.
-
At Least 1 GB of Free Disk Space
You'll need at least 1 GB of free disk space to run the Sandbox. However, more free space is always better, especially if you plan to install software or download files within the Sandbox.
-
Dual-Core Processor
A dual-core processor is the minimum requirement, but a processor with more cores will provide better performance.
How to Enable Virtualization
If you meet the Windows edition and hardware requirements, enabling virtualization is the next key step. Here’s how to check and enable it:
-
Check Virtualization Status
Open Task Manager (Ctrl+Shift+Esc), go to the Performance tab, and look for Virtualization.If it says "Enabled," you're good to go. If it says "Disabled," you'll need to enable it in your BIOS or UEFI settings.
-
Access BIOS/UEFI Settings
Restart your computer and press the appropriate key to enter the BIOS or UEFI settings. This key varies depending on your motherboard manufacturer, but it's usually Del, F2, F12, or Esc. The boot screen usually displays the correct key.
-
Enable Virtualization
Look for settings related to "Virtualization Technology," "VT-x," "AMD-V," or similar terms. Enable these settings and save your changes. Your computer will then restart.
Step-by-Step Guide to Using Windows 10 Sandbox
Now that you've verified your system meets the requirements and virtualization is enabled, let's get to the fun part: using the Windows Sandbox!
-
Enabling the Windows Sandbox Feature
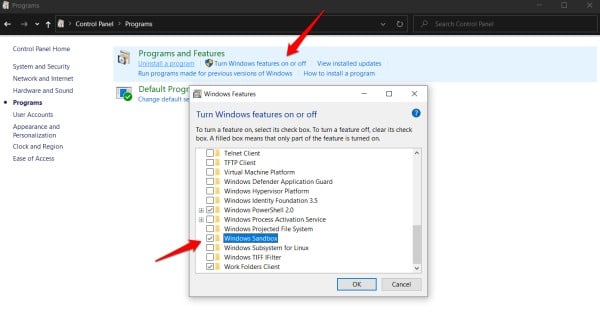
• Open the Control Panel. You can search for it in the Windows search bar.
• Go to "Programs" then click on "Turn Windows features on or off."
• Scroll down until you find "Windows Sandbox." Check the box next to it.
• Click OK.Windows will install the necessary files and prompt you to restart your computer.
-
Launching the Windows Sandbox
• After restarting, search for "Windows Sandbox" in the Windows search bar.
• Click on the "Windows Sandbox" icon to launch it.
• A new window will appear, resembling a fresh installation of Windows 10.
-
Using the Sandbox
• Inside the Sandbox, you can browse the web, install software, open files, and do anything else you would normally do on your computer.
• To install software, you can either download it directly from the web within the Sandbox or copy the installation files from your main system to the Sandbox.
• Remember, anything you do in the Sandbox stays in the Sandbox. When you close the Sandbox window, all changes are discarded.
-
Copying Files to and from the Sandbox
• You can easily copy files to and from the Sandbox using the clipboard. Simply copy the file from your main system and paste it into the Sandbox, or vice versa.
• Another option is to use a shared folder. Create a folder on your main system and share it with the Sandbox. This allows you to easily transfer files between the two environments.
-
Closing the Sandbox
• When you're finished using the Sandbox, simply close the window.
• A warning message will appear, reminding you that all changes will be discarded. Click "OK" to proceed.
• The Sandbox will close, and all data will be permanently deleted.
Advanced Tips and Tricks
Want to take your Sandbox skills to the next level? Here are some advanced tips and tricks to maximize your experience:
-
Sandbox Configuration Files
For those who want a pre-configured Sandbox environment, you can create configuration files (.wsb) that automatically run specific programs or scripts when the Sandbox is launched. This can save you time and effort if you frequently use the Sandbox for the same tasks. You can find detailed information and examples of Sandbox configuration files on the Microsoft documentation website. Example use case: A security analyst could configure a sandbox with specific network analysis tools to quickly investigate suspicious network traffic.
-
Resource Limits
By default, the Sandbox uses a limited amount of system resources. If you're running demanding applications within the Sandbox, you may need to adjust these limits to improve performance. However, be cautious when increasing resource limits, as this can impact the performance of your main system. Using configuration files, you can specify the amount of RAM, v CPUs and networking that are assigned to the Sandbox.
-
Networking Considerations
The Windows Sandbox uses a virtual network adapter to connect to the internet. By default, the Sandbox shares your main system's internet connection. However, you can configure the Sandbox to use a different network connection or to disable networking entirely. This can be useful if you want to isolate the Sandbox for security reasons. You can disable the shared networking in a sandbox configuration file.
-
Security Best Practices
While the Windows Sandbox provides a secure environment, it's still important to follow security best practices. Avoid downloading files from untrusted sources, be cautious when entering sensitive information, and keep your antivirus software up to date. While it may seem redundant, doing so within the Sandbox can prevent the spread of particularly virulent attacks. Example: When testing an application that interacts with the internet, use a secure DNS provider within the Sandbox to minimize the risk of DNS-based attacks.
Frequently Asked Questions
Let's address some common questions about the Windows 10 Sandbox:
Q1: Does the Windows Sandbox slow down my computer?
A: The Windows Sandbox utilizes a small amount of system resources while running, but it shouldn't significantly slow down your computer. However, if you're running demanding applications within the Sandbox, it may impact performance. Closing the Sandbox will free up those resources.
Q2: Can malware escape the Windows Sandbox?
A: The Windows Sandbox is designed to be a highly secure environment. Malware is extremely unlikely to escape the Sandbox and infect your main system. However, it's always a good idea to follow security best practices and avoid downloading files from untrusted sources.
Q3: Is the Windows Sandbox the same as a virtual machine?
A: While both the Windows Sandbox and virtual machines provide isolated environments, they are different in several key aspects. The Sandbox is lightweight and easy to use, while virtual machines are more complex and offer greater flexibility. The Sandbox uses a streamlined approach to create a temporary environment, while virtual machines require a full operating system installation.
Q4: Can I use the Windows Sandbox to test software compatibility?
A: Yes, the Windows Sandbox is an excellent tool for testing software compatibility. You can install the software in the Sandbox and see how it behaves without affecting your main system. This is particularly useful for testing older software or software that may not be compatible with your current version of Windows.
Conclusion: Embrace Risk-Free Exploration
In conclusion, the Windows 10 Sandbox is a powerful and versatile tool that offers a secure and isolated environment to explore the digital world without fear. Whether you're testing new software, exploring untrusted websites, or opening suspicious files, the Sandbox provides a safety net that protects your main system from potential harm. By following the steps outlined in this guide, you can harness the power of the Windows Sandbox and unlock a world of risk-free exploration.
Now it's your turn! Take the plunge and enable the Windows Sandbox on your system. Experiment with different software, explore new websites, and open those suspicious files with confidence. You might be surprised at what you discover. So, what are you waiting for? Go forth and explore, knowing that you have the power of the Windows Sandbox to protect you!
What will you test first in your newfound digital playground?
)
Post a Comment for "How to Use the Windows 10 Windows Sandbox Feature (if available)"
Post a Comment