How to Use the Windows 10 Virtualization Features
Unlocking Hidden Powers: A Guide to Windows 10 Virtualization
Hey there, tech enthusiasts! Ever feel like your computer is a one-trick pony, capable of only running the operating system it came with? Do you ever wish you could try out different operating systems, like Linux, or even older versions of Windows, without messing with your main setup? Or maybe you're a software developer who needs to test your applications on multiple platforms without cluttering your hard drive with different machines. Well, guess what? Windows 10 has a secret weapon, a hidden superpower, if you will, that can help you do all of that and more: Virtualization!
Now, I know what you might be thinking: "Virtualization? Sounds complicated!" And I won't lie, the term itself can sound a bit intimidating. But trust me, the concept is actually quite simple, and Windows 10 makes it surprisingly accessible. Think of it like this: imagine you have a house with only one room. That's your computer running its normal operating system. Now, imagine you build a miniature house inside that room, complete with its own walls, furniture, and even its own little front door. That's virtualization! You're essentially creating a virtual computer, a software-based replica of a physical machine, within your existing computer.
This virtual computer, or virtual machine (VM), can run its own operating system and applications completely independently of your main operating system. It's like having a separate computer inside your computer! This opens up a whole world of possibilities. You can experiment with different operating systems, test software in a safe environment, run legacy applications that are incompatible with your current OS, and even create isolated environments for different tasks. It's like having a digital playground where you can experiment without fear of breaking anything.
But here's the thing: many people don't even realize that Windows 10 has this built-in virtualization capability. It's often disabled by default, hiding in the depths of the system settings. It's like having a turbo button on your car that you never knew existed! And that's a shame because virtualization can be incredibly useful for both casual users and power users alike.
Maybe you've heard whispers about terms like "Hyper-V" and "Virtual Box," or perhaps you've stumbled across cryptic settings in your BIOS. Don't worry, we're going to demystify all of that. We'll walk you through the process of enabling virtualization in Windows 10, step by step, and show you how to create your very own virtual machines. We'll even cover some of the common pitfalls and troubleshooting tips to help you avoid any headaches along the way.
So, are you ready to unlock the hidden power of virtualization in Windows 10? Are you ready to transform your computer into a versatile testing ground, a multi-OS powerhouse, and a safe haven for experimentation? Then buckle up, friends, because we're about to embark on a virtual adventure!
How to Unleash the Power of Windows 10 Virtualization
Alright, let's dive into the exciting world of Windows 10 virtualization! We're going to break down the process into manageable steps, so even if you're a complete beginner, you'll be able to follow along with ease.
Checking for Virtualization Support
Before we get started, it's important to make sure that your computer actually supports virtualization. Most modern computers do, but it's always good to double-check. Here's how:
- Open Task Manager: Press Ctrl+Shift+Esc to open the Task Manager.
- Navigate to the Performance Tab: Click on the "Performance" tab.
- Check the CPU Section: Look for "Virtualization" in the CPU section. If it says "Enabled," you're good to go! If it says "Disabled," you'll need to enable it in your BIOS settings (more on that later).
If it shows disabled, don't panic! It just means you need to flip a switch in your computer's BIOS. Think of it like a breaker switch in your house – it's just turned off for now.
Enabling Virtualization in BIOS
This is where things might get a little technical, but don't worry, we'll guide you through it. Accessing your BIOS can vary depending on your computer's manufacturer, but here's the general idea:
- Restart Your Computer: Shut down your computer completely.
- Enter BIOS Setup: Turn your computer back on and immediately start pressing the BIOS key. This is usually Del, F2, F12, Esc, or some other key. The key to press is often displayed briefly on the screen during startup.
- Find Virtualization Settings: Once you're in the BIOS setup, look for settings related to "Virtualization Technology," "VT-x," "AMD-V," or similar terms. These settings are often found in the "Advanced," "CPU Configuration," or "Security" sections.
- Enable Virtualization: Enable the virtualization setting. It might be labeled as "Enabled," "On," or "Virtualization Technology."
- Save Changes and Exit: Save your changes and exit the BIOS setup. Your computer will restart.
Important Note: The BIOS interface can vary significantly between different manufacturers. If you're having trouble finding the virtualization settings, consult your computer's manual or search online for instructions specific to your motherboard. And remember, be careful when making changes in the BIOS, as incorrect settings can prevent your computer from booting properly.
Installing Hyper-V
Windows 10 comes with its own built-in virtualization platform called Hyper-V. This is a powerful and versatile tool that allows you to create and manage virtual machines directly from your Windows desktop. Here's how to enable it:
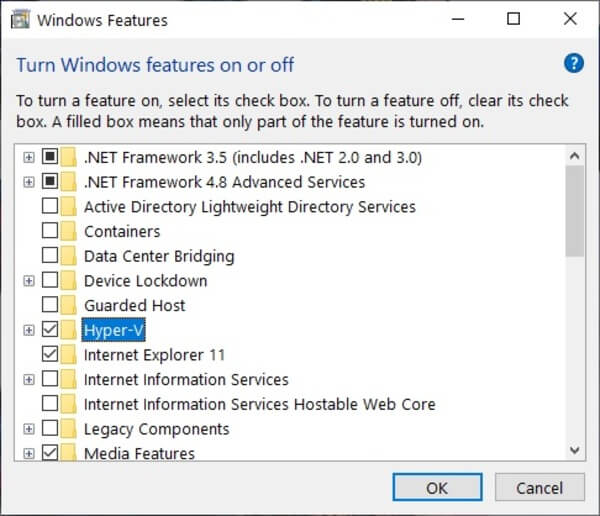
- Open Control Panel: Search for "Control Panel" in the Start menu and open it.
- Go to Programs: Click on Programs.
- Turn Windows Features On or Off: Under "Programs and Features," click on "Turn Windows features on or off."
- Enable Hyper-V: Find "Hyper-V" in the list and check the box next to it. Make sure both "Hyper-V Management Tools" and "Hyper-V Platform" are selected.
- Click OK: Click "OK" and wait for Windows to install the necessary files. You may be prompted to restart your computer.
Congratulations! You've now enabled Hyper-V, Windows 10's built-in virtualization powerhouse. Get ready to create some virtual machines!
Creating Your First Virtual Machine with Hyper-V
Now for the fun part: creating your very first virtual machine! Here's a step-by-step guide:
- Open Hyper-V Manager: Search for "Hyper-V Manager" in the Start menu and open it.
- Create a New Virtual Machine: In the Hyper-V Manager window, right-click on your computer's name in the left pane and select "New" -> "Virtual Machine."
- Follow the Wizard: A wizard will guide you through the process of creating the virtual machine. You'll need to specify a name for your VM, choose the amount of memory to allocate, configure networking, and select a virtual hard disk.
- Choose a Generation: You'll be prompted to choose between Generation 1 and Generation 2. Generation 2 is generally recommended for modern operating systems, but Generation 1 might be necessary for older operating systems.
- Allocate Memory: Allocate enough memory for the operating system you plan to install in the virtual machine. A good starting point is 2GB or 4GB, but you can adjust this later if needed.
- Configure Networking: If you want your virtual machine to have internet access, you'll need to configure networking. You can either connect it to your existing network adapter or create a virtual switch.
- Create a Virtual Hard Disk: You'll need to create a virtual hard disk to store the operating system and applications for your virtual machine. Choose a location for the virtual hard disk file and specify its size. A good starting point is 20GB or 30GB, but you can increase this later if needed.
- Choose an Installation Source: You'll need to provide an installation source for the operating system you want to install in the virtual machine. This can be an ISO image file or a physical DVD.
- Finish the Wizard: Review your settings and click "Finish" to create the virtual machine.
Your new virtual machine is now ready to go! You can find it listed in the Hyper-V Manager window. The first time you boot it up, it will be like turning on a brand new computer, asking you to install the operating system. You can then use it like any normal operating system.
Alternative: Using Virtual Box
While Hyper-V is a great option, it's not the only virtualization platform available for Windows 10. Another popular choice is Virtual Box, which is a free and open-source virtualization application from Oracle. Here’s how to get started with it:
- Download and Install Virtual Box: Download Virtual Box from the official Virtual Box website. The installation process is straightforward – just follow the on-screen instructions.
- Create a New Virtual Machine: Open Virtual Box and click on the "New" button. A wizard will guide you through the process of creating the virtual machine. The steps are similar to those in Hyper-V, where you'll need to specify a name, choose the operating system type and version, allocate memory, create a virtual hard disk, and select an installation source.
- Start the Virtual Machine: Once you've created the virtual machine, select it in the Virtual Box Manager window and click on the "Start" button. The virtual machine will boot up and prompt you to install the operating system.
Virtual Box is particularly favored for its user-friendly interface and cross-platform compatibility, making it a solid alternative if Hyper-V doesn’t quite fit your needs.
Tips and Troubleshooting
Virtualization can be a powerful tool, but it's not always smooth sailing. Here are some tips and troubleshooting suggestions to help you avoid common pitfalls:
- Ensure Sufficient Resources: Virtual machines consume system resources, such as CPU, memory, and disk space. Make sure your computer has enough resources to run both your main operating system and the virtual machine smoothly.
- Update Your Drivers: Keep your drivers up to date, especially your graphics card drivers. Outdated drivers can cause performance issues in virtual machines.
- Enable Enhanced Session Mode (Hyper-V): Enhanced Session Mode allows you to seamlessly copy and paste files between your host computer and the virtual machine. To enable it, go to Hyper-V Manager, right-click on your virtual machine, select "Connect," and then click on "Enhanced Session Mode" in the toolbar.
- Install Guest Additions (Virtual Box): Guest Additions are a set of drivers and utilities that improve the performance and usability of virtual machines in Virtual Box. To install them, start the virtual machine, go to the "Devices" menu, and select "Insert Guest Additions CD image."
- Troubleshoot Network Issues: If your virtual machine is unable to connect to the internet, check your network settings. Make sure the virtual network adapter is configured correctly and that your firewall is not blocking the virtual machine's network traffic.
- Consider SSD for Performance: Running your VMs off of a Solid State Drive (SSD) will significantly improve performance, especially during boot-up and when accessing files within the VM.
Remember, the key to successful virtualization is patience and experimentation. Don't be afraid to try different settings and configurations to find what works best for you. The beauty of virtualization is that you can experiment without risking your main system.
Frequently Asked Questions About Windows 10 Virtualization
Here are some common questions people have about virtualization in Windows 10:
- Question: What's the difference between Hyper-V and Virtual Box?
Answer: Hyper-V is a built-in virtualization platform in Windows 10, while Virtual Box is a third-party application. Both allow you to create and manage virtual machines, but they have different features and capabilities. Hyper-V is often preferred for its tight integration with Windows, while Virtual Box is known for its user-friendly interface and cross-platform compatibility.
- Question: Can I run multiple virtual machines at the same time?
Answer: Yes, you can run multiple virtual machines simultaneously, but keep in mind that each virtual machine consumes system resources. Running too many virtual machines at once can impact performance.
- Question: Is virtualization secure?
Answer: Virtualization can provide a degree of isolation between the virtual machine and the host operating system, which can enhance security. However, it's important to keep your virtual machines up to date with the latest security patches and to follow security best practices.
- Question: Can I use virtualization to run older versions of Windows?
Answer: Yes, you can use virtualization to run older versions of Windows, such as Windows XP or Windows 7. This can be useful for running legacy applications that are not compatible with Windows
10.
Hopefully, these FAQs have helped to clarify some of the common questions surrounding virtualization. Remember, the best way to learn is by doing, so don't hesitate to experiment and explore the possibilities of virtualization!
So there you have it, friends! We've covered everything you need to know to get started with Windows 10 virtualization. You've learned how to check for virtualization support, enable virtualization in your BIOS, install Hyper-V, create your first virtual machine, and troubleshoot common issues. You now possess the knowledge to use the full functionality of Windows 10 virtualization!
Now it's your turn! Go ahead and unlock the hidden power of virtualization in Windows 10. Experiment with different operating systems, test software in a safe environment, and explore the endless possibilities that virtualization has to offer. The power is literally in your hands.
We invite you to embrace the flexibility and power of virtualization. Install Hyper-V or Virtual Box today and create your first virtual machine. What operating system will you try first? The world is your virtual oyster!
Unleash your inner techie and start virtualizing today! Now, the real question is: What virtual adventure will you embark on first?
Post a Comment for "How to Use the Windows 10 Virtualization Features"
Post a Comment