How to Use the Windows 10 Remote Desktop Feature
Unlock Your Windows 10: A Simple Guide to Remote Desktop Freedom
Hey there, tech enthusiasts and busy bees! Ever wished you could access your home computer while lounging on a beach in Bali? Okay, maybe not Bali specifically, but the sentiment is there, right? Imagine leaving that crucial presentation file on your desktop and panicking… only to remember you can just Remote Desktop in and grab it. Disaster averted! Or perhaps you're the go-to tech support for your family (we've all been there!), and wouldn't it be easier to justshowthem how to fix their printer remotely instead of spending hours on the phone? Well, Windows 10 Remote Desktop is your superhero cape in disguise.
We live in a world where being tethered to a single location feels increasingly… archaic. The rise of remote work, the gig economy, and simply the desire for more flexibility have made remote access a necessity, not a luxury. But let's be honest, the world of networking and protocols can feel like navigating a labyrinth built by a sleep-deprived programmer. Jargon like "IP addresses," "firewall exceptions," and "network authentication" can send even seasoned computer users running for the hills. And that's precisely where this guide comes in.
Think of Remote Desktop as a virtual doorway to your computer. It allows you to control another computer (the "host") from your own device (the "client") as if you were sitting right in front of it. You can open files, run programs, and even troubleshoot issues, all from a different location. Pretty neat, huh? But before you start dreaming of controlling your entire digital life from your smartphone, let's address the elephant in the room: the setup. Setting up Remote Desktop can feel daunting, especially if you're not a networking guru. But fear not! We're here to break it down into bite-sized, easy-to-follow steps. We're talking about a process so straightforward, even your grandma could probably do it (no offense, grandmas!).
Now, you might be thinking, "Okay, sounds great, but is it secure? I don't want hackers waltzing into my computer!" That's a valid concern, and we'll address security best practices throughout this guide to ensure your remote connection is as safe as Fort Knox. We’ll also explore common pitfalls and troubleshooting tips to help you overcome any roadblocks you might encounter along the way. Think of this as your comprehensive, no-nonsense guide to unlocking the power of Windows 10 Remote Desktop. We'll cover everything from enabling the feature to configuring your firewall and even using Remote Desktop over the internet.
So, are you ready to break free from the constraints of physical location and embrace the freedom of remote access? Are you ready to become the master of your digital domain, controlling your computers from anywhere in the world (or at least from your couch)? Stick with us, and you'll be a Remote Desktop pro in no time! Let’s dive in and discover how to unlock your Windows 10 with the power of Remote Desktop. What are you waiting for? Let's get started!
Setting Up Remote Desktop: Your Step-by-Step Guide
Alright, friends, let’s get our hands dirty and dive into the actual process of setting up Remote Desktop on your Windows 10 machine. Don't worry; we'll take it one step at a time, making sure everything is crystal clear.
Enabling Remote Desktop on the Host Computer
First things first, we need to enable Remote Desktop on the computer you want to control remotely (the "host"). Think of it as opening the door to your digital fortress.
- Head over to your Windows settings. You can do this by clicking the Start button and then clicking the gear icon, or simply by pressing the Windows key + I.
- Once you're in the Settings app, click on System.
- In the System settings, find and click on "Remote Desktop" in the left-hand menu.
- Now, here’s the important part: toggle the "Enable Remote Desktop" switch to the "On" position. Windows will likely display a warning message explaining the risks associated with enabling Remote Desktop. Don't panic! Just click "Confirm" to proceed.
- Underneath the "Enable Remote Desktop" switch, you'll see a section called "How to connect to this PC." This section provides the name of your computer, which you'll need later when connecting from another device. Make a note of it!
- (Optional but recommended) Click on "Show settings" next to "Require computers to use Network Level Authentication…" This adds an extra layer of security. If you uncheck this box, computers running older versions of Windows can connect, but it's generally less secure.
Configuring User Accounts for Remote Access
Enabling Remote Desktop is only half the battle. You also need to specify which user accounts are allowed to connect remotely.
- Back in the Remote Desktop settings, look for the "Select users that can remotely access this PC" link and click on it.
- A window will pop up listing the current users on your computer. If the user account you want to use for remote access is already listed, you're good to go!
- If the user account isn't listed, click the "Add..." button.
- In the "Select Users or Groups" window, type the username of the account you want to add and click "Check Names." Windows will attempt to find the account.
- If the account is found, click OK.If not, double-check the username and try again.
- Once you've added the desired user accounts, click "OK" to close the "Remote Desktop Users" window.
Understanding Network Level Authentication (NLA)
We briefly touched upon Network Level Authentication (NLA) earlier, but let's delve a bit deeper into why it's a good idea to keep it enabled.
- NLA adds an extra layer of security by requiring the client computer to authenticate the userbeforeestablishing the Remote Desktop connection. This helps protect against malicious users who might try to exploit vulnerabilities in the Remote Desktop protocol.
- With NLA enabled, the user is prompted for their credentialsbeforethe Remote Desktop session even starts. This means that if someone tries to connect to your computer without the correct username and password, they won't even get a chance to see your desktop.
- While NLA is generally a good thing, it's important to note that it requires the client computer to support NLA. Older versions of Windows might not support it, which is why you might need to disable it temporarily if you're connecting from an older machine. However, for maximum security, it's always best to keep NLA enabled whenever possible.
Finding Your Computer's IP Address
To connect to your host computer remotely, you'll need its IP address. Think of it as the computer's unique address on the internet (or your local network).
- Open the Command Prompt. You can do this by typing "cmd" in the Windows search bar and pressing Enter.
- In the Command Prompt window, type "ipconfig" and press Enter.
- A bunch of information will be displayed. Look for the line that says "IPv4 Address." The number next to it is your computer's IP address. Make a note of it! (It usually looks something like 192.168.1.x or
10.0.0.x if you're on a local network).
- If you plan to access your computer fromoutsideyour home network (i.e., over the internet), you'll need yourpublic IP address. The easiest way to find this is to simply Google "what is my IP address." Google will display your public IP address at the top of the search results.
Configuring Your Firewall
Windows Firewall is like a bouncer for your computer, controlling which connections are allowed in and out. By default, it might block Remote Desktop connections. We need to make sure it's letting the right people (or rather, the right data packets) through.
- Open the Windows Firewall. You can do this by typing "firewall" in the Windows search bar and clicking on "Windows Defender Firewall."
- Click on "Allow an app or feature through Windows Firewall" in the left-hand menu.
- Click the "Change settings" button at the top of the window. You might need to provide administrator credentials to proceed.
- Scroll through the list of apps and features until you find "Remote Desktop."
- Make sure that the box next to "Remote Desktop" is checked for both "Private" and "Public" networks (if applicable).
- Click "OK" to save your changes.
Connecting from the Client Computer
Now that we've prepared the host computer, let's switch gears and connect from the client computer (the one you'll be using to control the host).
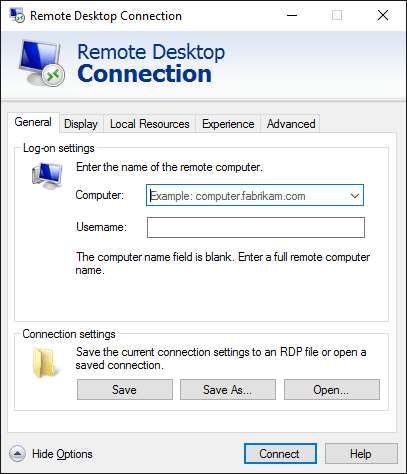
- On the client computer, search for "Remote Desktop Connection" in the Windows search bar and open the app.
- In the "Computer" field, type the IP address of the host computer that you noted down earlier. If you're connecting over the internet, use the public IP address. If you're connecting on the same local network, use the private IP address. Alternatively, you can try using the computer name you found in the Remote Desktop settings on the host computer.
- Click Connect.
- You'll be prompted to enter the username and password of a user account on the host computer that has been granted remote access permissions (as we configured earlier).
- Enter the credentials and click OK.
- If everything is configured correctly, you should now see the desktop of the host computer on your client computer! You can now control the host computer as if you were sitting right in front of it.
Troubleshooting Common Issues
Sometimes, things don't go quite as planned. Here are some common issues you might encounter and how to fix them.
- "Remote Desktop can't connect to the remote computer" error: This usually indicates a network connectivity issue. Make sure both computers are connected to the internet (or the same local network). Double-check the IP address you're using and ensure it's correct. Also, verify that the host computer's firewall is configured correctly to allow Remote Desktop connections.
- "Access is denied" error: This usually means that the user account you're trying to use doesn't have permission to connect remotely. Make sure you've added the correct user account to the "Remote Desktop Users" list on the host computer. Also, double-check that you're entering the correct username and password.
- Slow performance: Remote Desktop performance can be affected by network speed and latency. If you're experiencing slow performance, try closing unnecessary applications on both computers. Also, consider reducing the display resolution and color depth in the Remote Desktop Connection settings.
Using Remote Desktop Over the Internet
Connecting over the internet requires a bit more configuration, as you need to deal with network address translation (NAT) and port forwarding.
- Port Forwarding: You'll need to configure your router to forward port 3389 (the default Remote Desktop port) to the internal IP address of your host computer. The exact steps for doing this vary depending on your router model, so consult your router's documentation for instructions.
- Dynamic DNS: If your internet service provider (ISP) assigns you a dynamic IP address (which changes periodically), you'll need to use a dynamic DNS service to keep track of your IP address. This allows you to access your computer using a domain name instead of a constantly changing IP address. There are many dynamic DNS providers available, such as No-IP and Dyn DNS.
- Security Considerations: Exposing Remote Desktop directly to the internet can be risky, as it makes your computer more vulnerable to attacks. Consider using a virtual private network (VPN) to create a secure tunnel between your client and host computers. Alternatively, you can use a Remote Desktop gateway, which adds an extra layer of security.
Security Best Practices for Remote Desktop
Security is paramount when using Remote Desktop, especially over the internet. Here are some essential security best practices to keep your computer safe.
- Use Strong Passwords: This should be a no-brainer, but it's worth repeating. Use strong, unique passwords for all user accounts on your computer, especially the ones you use for remote access.
- Enable Network Level Authentication (NLA): As mentioned earlier, NLA adds an extra layer of security by requiring authentication before the Remote Desktop session starts.
- Keep Your Software Up to Date: Regularly update your operating system, antivirus software, and other applications to patch security vulnerabilities.
- Use a VPN: A VPN creates a secure tunnel between your client and host computers, protecting your data from eavesdropping.
- Limit Remote Access: Only grant remote access permissions to user accounts that absolutely need it.
- Monitor Remote Desktop Activity: Regularly check the event logs on your host computer for any suspicious Remote Desktop activity.
- Consider Using a Remote Desktop Gateway: A Remote Desktop gateway acts as a proxy server, adding an extra layer of security between your computer and the internet.
- Disable Remote Desktop When Not in Use: If you're not actively using Remote Desktop, disable it to reduce the risk of unauthorized access.
Advanced Remote Desktop Features
Once you've mastered the basics of Remote Desktop, you can explore some of its more advanced features.
- Remote Audio Playback: You can configure Remote Desktop to play audio from the host computer on your client computer. This is useful if you want to listen to music or watch videos remotely.
- Clipboard Redirection: You can copy and paste text and files between your client and host computers. This makes it easy to transfer data between the two machines.
- Printer Redirection: You can print documents from the host computer on a printer connected to your client computer.
- Drive Redirection: You can access the drives and folders on your client computer from the host computer. This allows you to easily transfer files between the two machines.
- Multiple Monitors: If your client computer has multiple monitors, you can use them to display the desktop of the host computer across multiple screens.
Beyond the Basics: Remote Desktop Alternatives
While Windows 10 Remote Desktop is a powerful tool, it's not the only option available. Here are some popular alternatives:
- Team Viewer: Team Viewer is a popular remote access solution that's known for its ease of use and cross-platform compatibility. It's a great option for both personal and commercial use.
- Any Desk: Any Desk is another popular remote access solution that's known for its speed and performance. It's a good choice for users who need to access their computers over low-bandwidth connections.
- Chrome Remote Desktop: Chrome Remote Desktop is a free remote access solution from Google. It's simple to set up and use, and it works on a variety of platforms.
- VNC Connect: VNC Connect is a remote access solution that's based on the Virtual Network Computing (VNC) protocol. It's a good choice for users who need a more technical and customizable solution.
Each of these options has its own strengths and weaknesses, so it's worth exploring them to see which one best fits your needs.
Frequently Asked Questions
Let's tackle some common questions about Windows 10 Remote Desktop.
- Q: Is Remote Desktop safe to use?
- A: Yes, Remote Desktop can be safe to use if you follow security best practices, such as using strong passwords, enabling Network Level Authentication, and keeping your software up to date. Using a VPN can also add an extra layer of security.
- Q: Can I use Remote Desktop to access my computer from my phone?
- A: Yes, there are Remote Desktop apps available for both i OS and Android devices. These apps allow you to connect to your Windows 10 computer from your phone or tablet.
- Q: Does Remote Desktop work with all versions of Windows 10?
- A: Remote Desktophostfunctionality (the ability to be connectedto) is only available in Windows 10 Pro, Enterprise, and Education editions. However, you canconnectto a remote computer from any edition of Windows
10.
- Q: I'm having trouble connecting to my computer over the internet. What should I do?
- A: First, make sure that your router is configured to forward port 3389 to the internal IP address of your host computer. Also, ensure that you're using the correct public IP address or dynamic DNS hostname. If you're still having trouble, consider using a VPN to create a secure connection.
Wrapping Up and Taking Control
Well, there you have it! We've journeyed through the ins and outs of Windows 10 Remote Desktop, from the initial setup to advanced features and security considerations. You're now equipped with the knowledge to unlock the full potential of remote access, allowing you to control your computers from anywhere in the world (or at least from your couch!). We started by highlighting the importance of remote access in today’s flexible world, and then dove straight into enabling the feature on your Windows 10 machine, emphasizing the need for strong passwords and proper user account configuration. We then navigated the tricky waters of firewalls and IP addresses, ensuring you know how to find your computer and allow Remote Desktop to communicate effectively. We also addressed common troubleshooting issues, so you’re prepared for any hiccups along the way.
But knowledge is only power when it's put into action. So, what's the next step? It's simple: go try it! Enable Remote Desktop on your computer, configure your firewall, and connect from another device. Experiment with the various settings and features, and see how Remote Desktop can streamline your workflow and make your life easier. Think about the possibilities: accessing your files from anywhere, providing remote support to family and friends, or even just working from your backyard while enjoying the sunshine.
The power is now in your hands. Embrace the freedom and flexibility that Remote Desktop offers, and unlock a new level of productivity and convenience. Don't be afraid to experiment and customize your setup to fit your specific needs. And remember, if you encounter any problems, this guide is always here to help. So, go forth and conquer the world of remote access! What new and exciting ways will you use your newfound Remote Desktop skills?
Post a Comment for "How to Use the Windows 10 Remote Desktop Feature"
Post a Comment